*Press Samples*
Hi everyone! Today I have KBShimmer's Spring 2015 Collection to share with you! This collection has 12 polishes total including 7 glitter crellies, 1 creme, 1 shimmery holo, and 3 ultra holos. These are all wonderful springy shades that I think everyone is going to LOVE, so let's take a closer look!
Saturday, January 31, 2015
Press Release: KBShimmer Spring 2015 Collection
*Press Release*
Say goodbye to winter’s dark hues, embrace sunny skies and open toe shoes with KBShimmer’s Spring 2015 collection!
KBShimmer Unveils Spring 2015 Collection
Say goodbye to winter’s dark hues, embrace sunny skies and open toe shoes with KBShimmer’s Spring 2015 collection!
Friday, January 30, 2015
Stained Glass Stamping Decals featuring piCture pOlish and Mo-You London
*Nothing to Disclose*
Hi everyone! Today I have my first adventures with stamping decals to share with you! I've been wanting to try this for awhile, and I've seen so many cute ones lately that I just decided to go for it! I'm really not sure who started the trend of making stamping decals, but I've seen a ton of ladies make such gorgeous manis with this technique. Here is a link to a super helpful video tutorial by Lucy's Stash if you are interested in trying it.
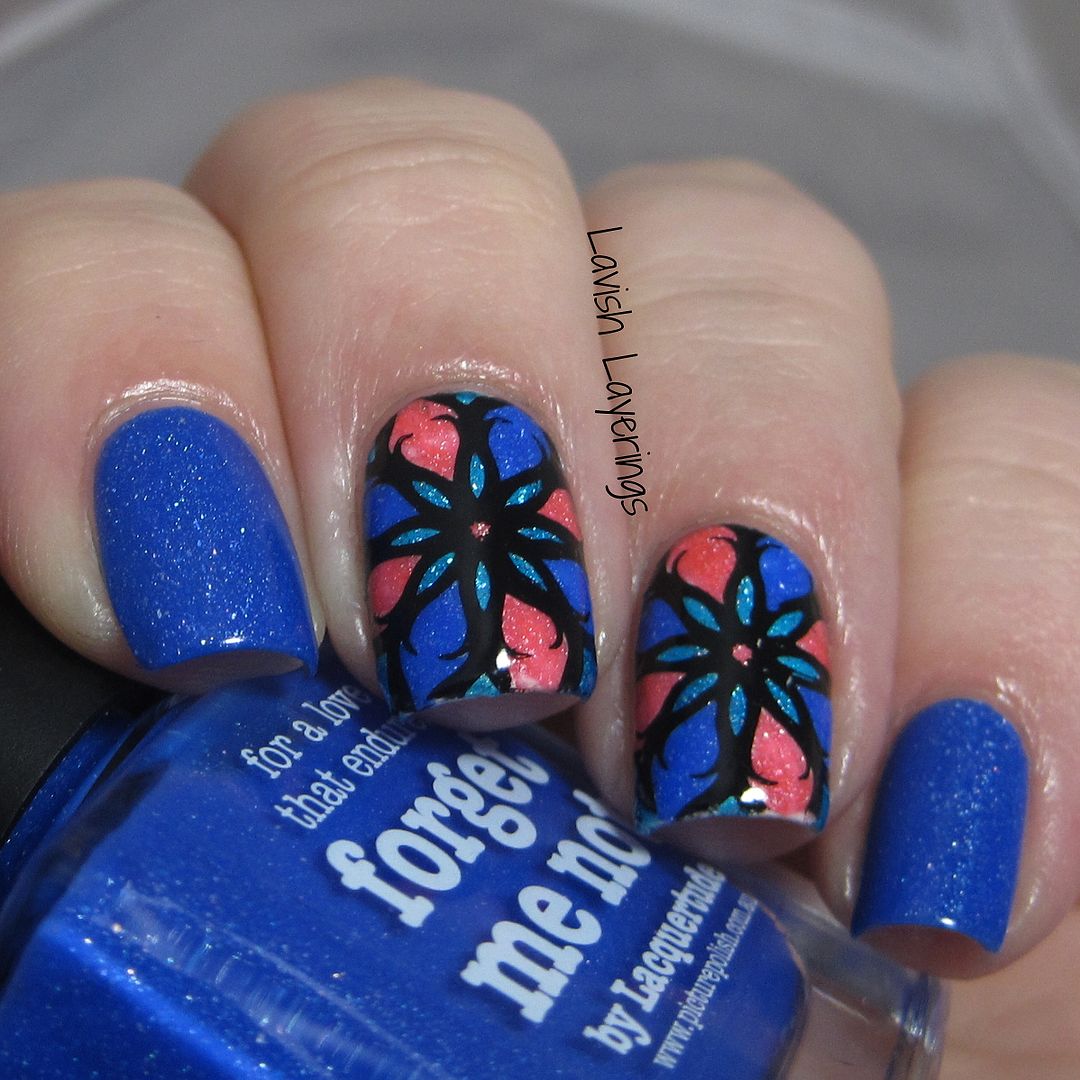
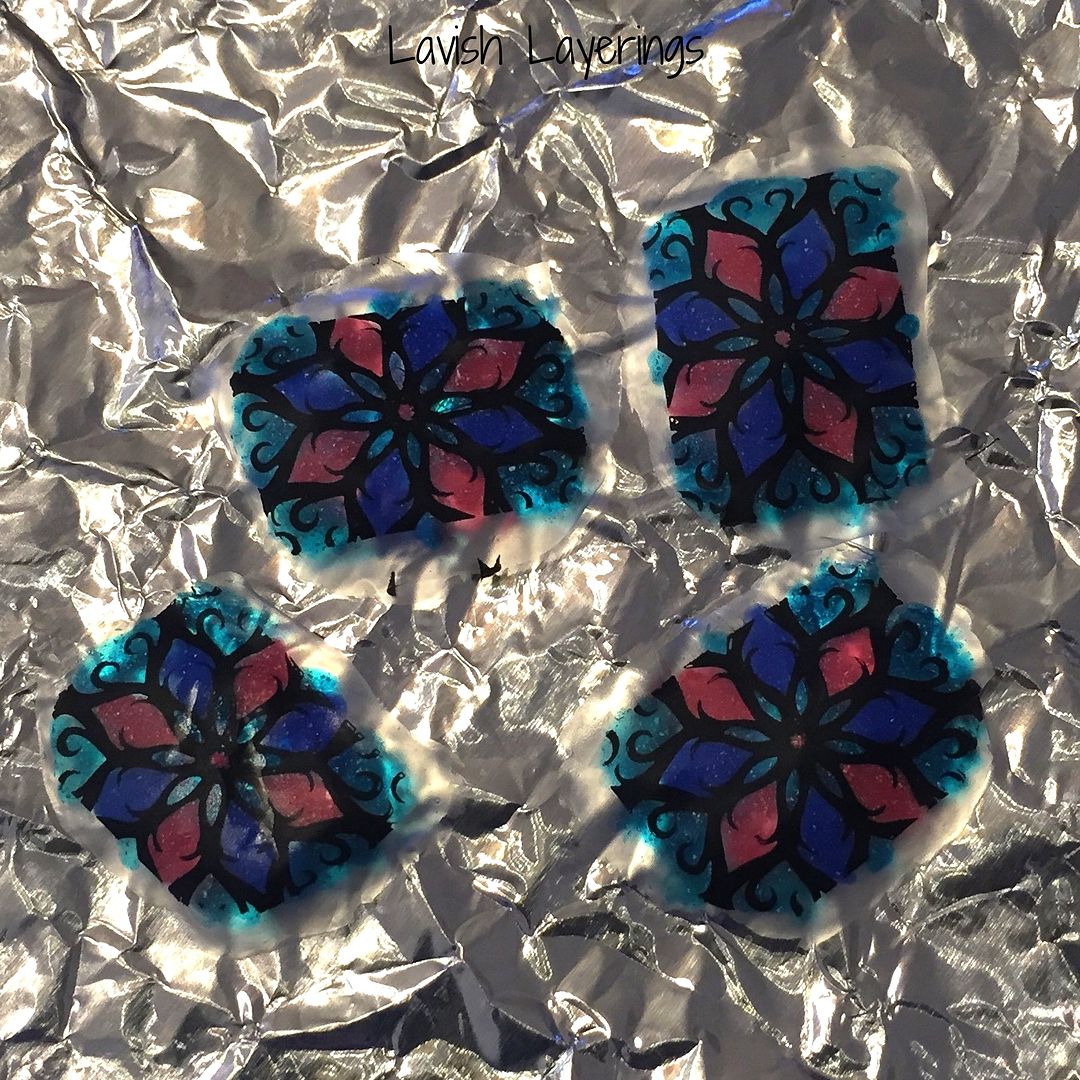
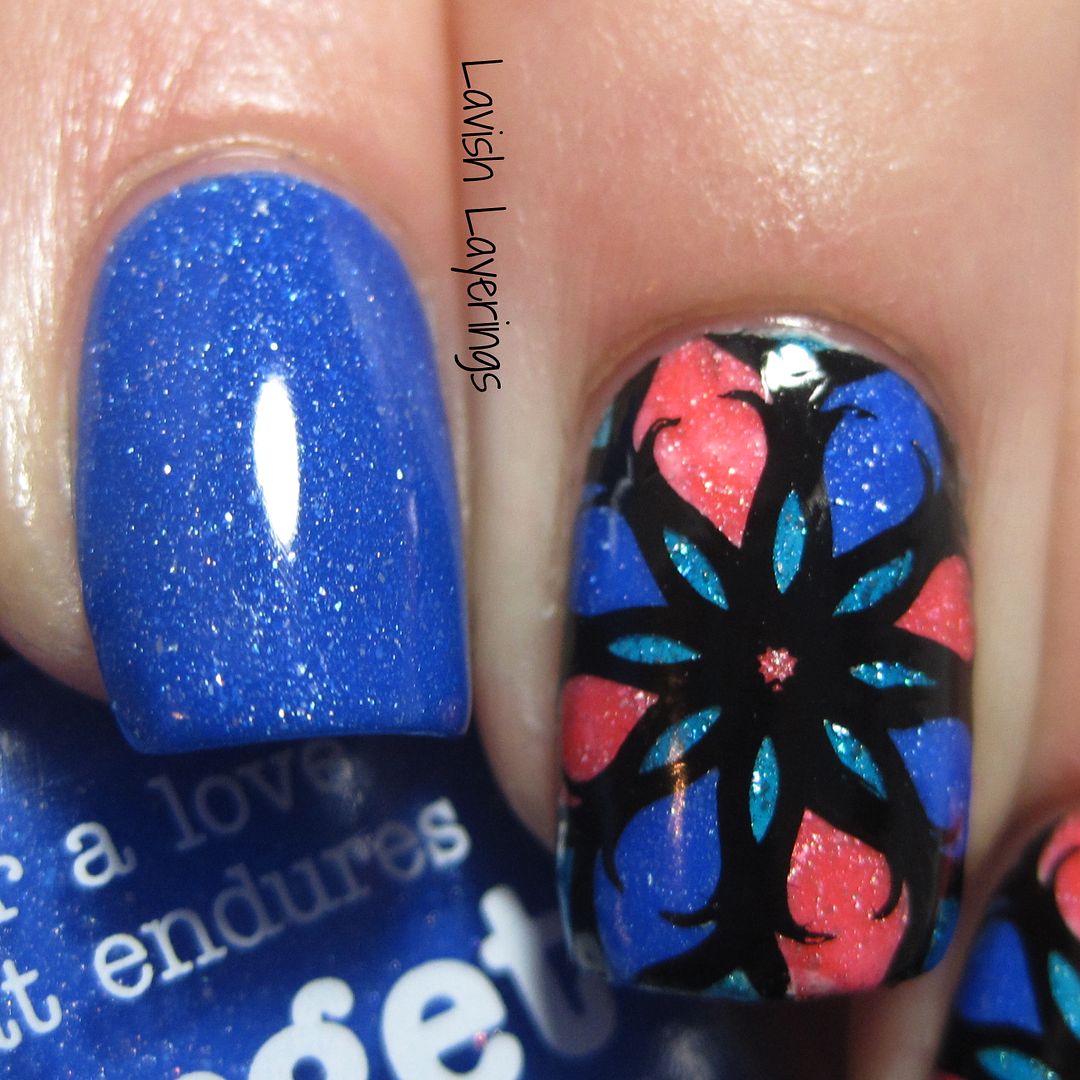
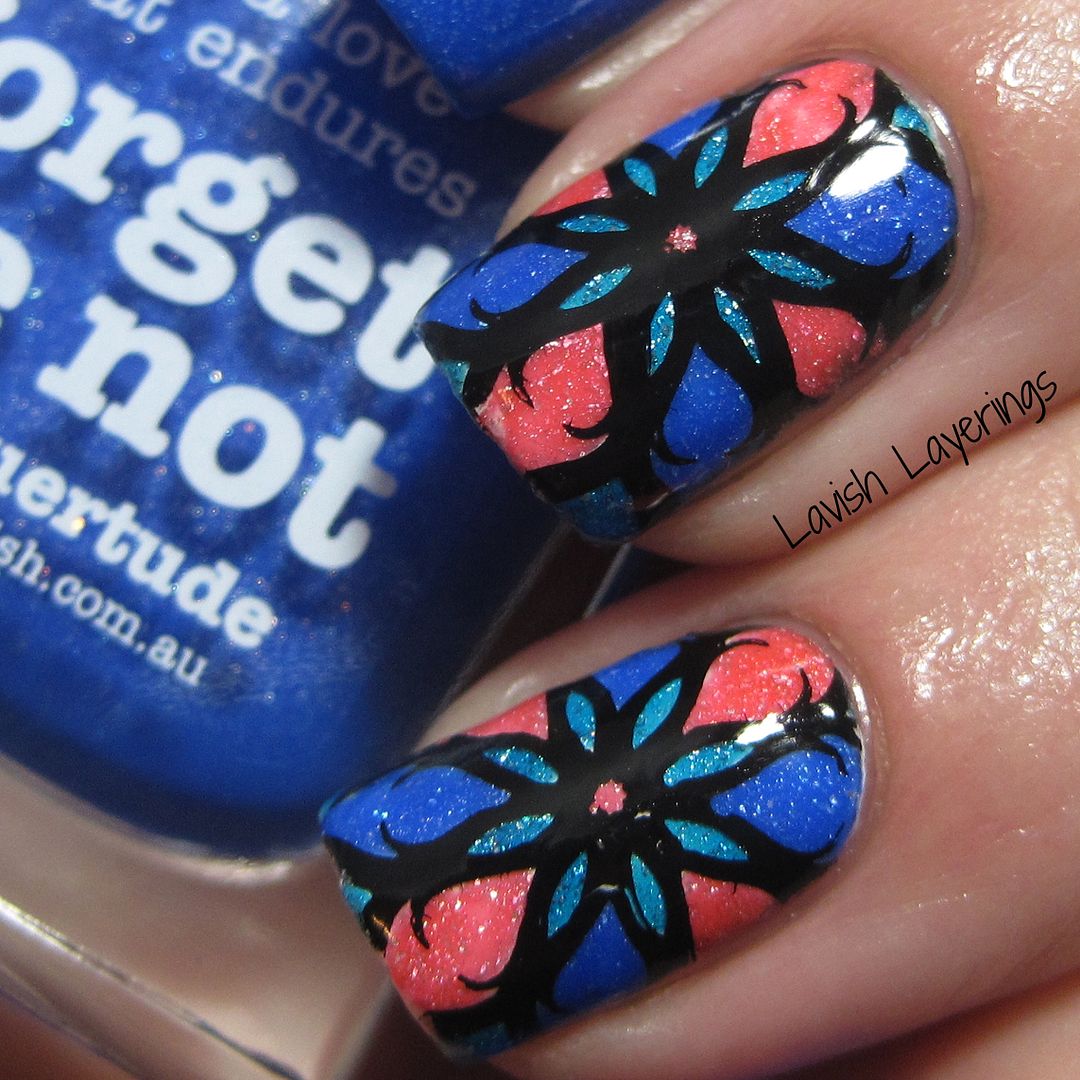
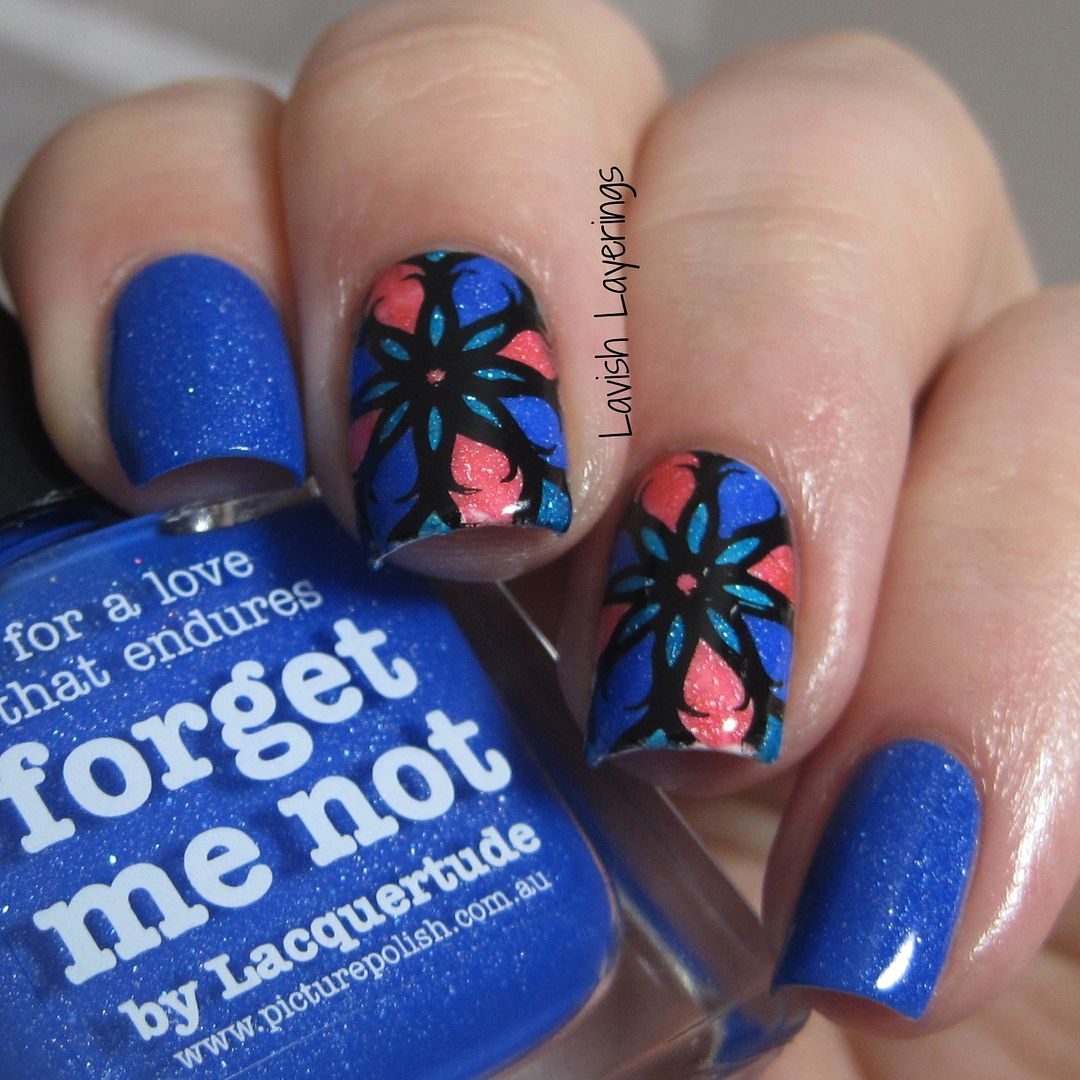
For my mani, I chose to just do accents of the stamped decals because they are a little time consuming. I used an image from the MoYou-London Kaleidoscope plate 06. That plate has a bunch of wonderful designs that are just perfect for this technique, and I think they give a stained glass effect when different colors are used like this. I stamped the image onto my stamper (I used Mundo de Unas Black for my stamping polish.) Then I used piCture pOlish Ocean, Paris, and Forget Me Not and filled in the image using a small brush. Next I painted on a coat of quick dry topcoat and allowed the image to dry completely, and then peeled off the entire decal with tweezers (seen below).
For the nails that I was applying my decals to, I started off with a white creme base and let it dry completely. This step might not be necessary for all polishes, but since the ones I used were jelly-ish in nature, I thought the white would help to make the colors pop if they were a bit thin in some areas. I trimmed the decals down as much as I could to fit my nail before application. This is really something you want to do (especially with a larger decal like this one) to avoid having to do excessive clean-up. I then painted on a coat of quick dry topcoat over the white polish and pressed the decal onto the nail, smoothing it out with my fingers. I then used my brush dipped in acetone to go around and clean up the excess around the edges. This not only works to clean up excess polish, but also helps to seal the decal around the edges. Finally, I finished off with two coats of topcoat. to make it smooth and glassy. On the nails that I didn't apply the decals to, I used piCture pOlish Forget Me Not on its own (which...holy gorgeous! I'm so glad I got that one finally!)
piCture pOlish products are available from their website based out of Australia. They do ship internationally and details about their shipping policies are available on their shipping page. piCture pOlish also has international stockists located all over the world. I usually order mine from Llarowe and Color4Nails, but a complete list of stockists is located on piCture pOlish's network page.
MoYou London stamping plates are available from their website. They have tons of gorgeous plates to choose from, so check them out! They are also now offering free shipping to the US, so that is awesome!
So what do you think of these nail decals? Have you tried them before? I think they are really fun, but I would only want to do them for accents most likely since they do take a good bit of time. Thanks for looking everyone!
Wednesday, January 28, 2015
Takko Lacquer Jabberwocky
*Nothing to Disclose*
Hi everyone! Today I have a beautiful Takko Lacquer polish to share with you. I have seen Takkos for ages, but I only recently got my first few of them (two of them were a sweet gift from a friend). The first one I decided to try is Jabberwocky. Random fun fact: when I was in college I took a public speaking class and we had to recite a poem one day. I decided to recite (from memory) Lewis Carroll's Jabberwocky with all of its nonsense words. Everyone pretty much thought I was a huge nerd...sooo...anyway...back to the polish!
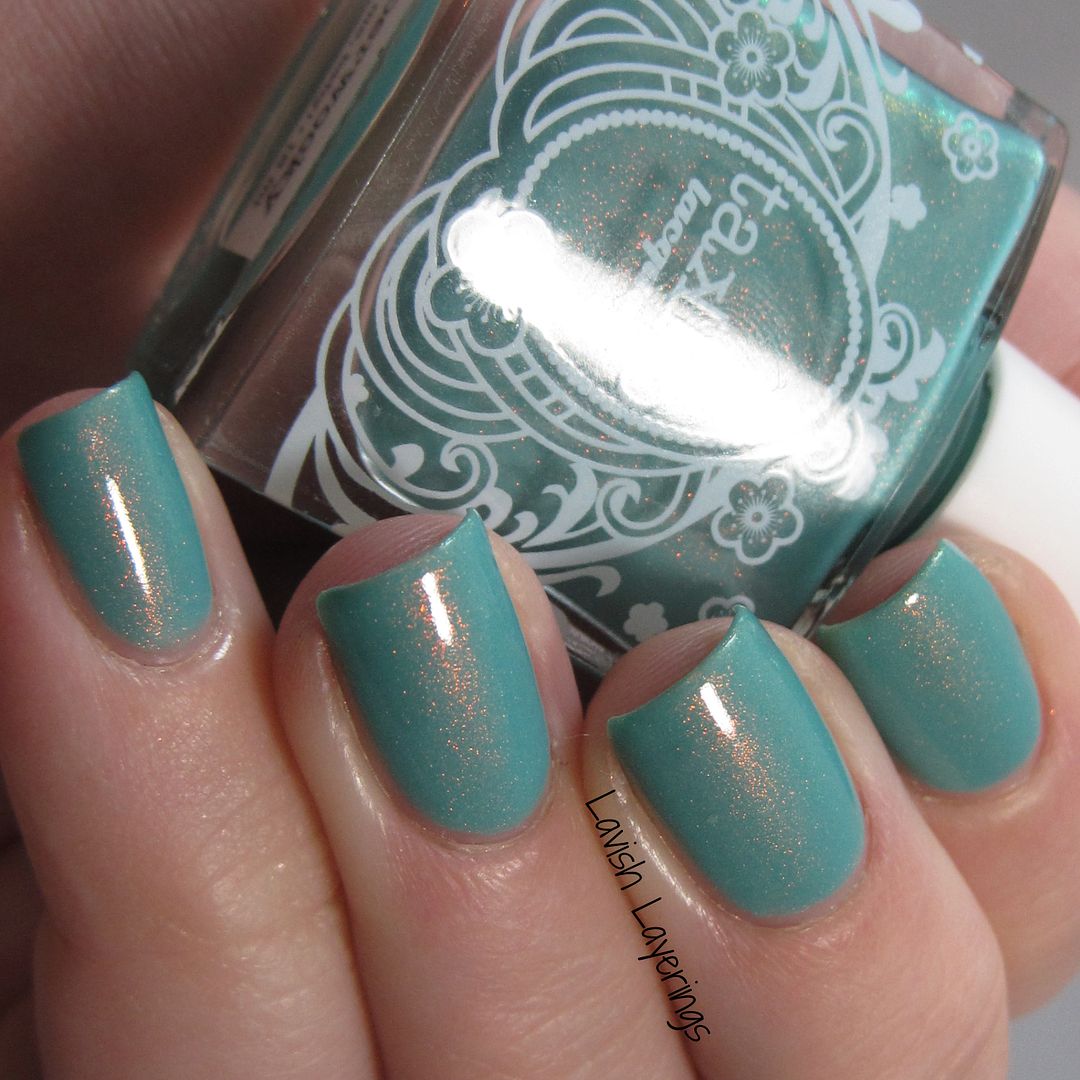
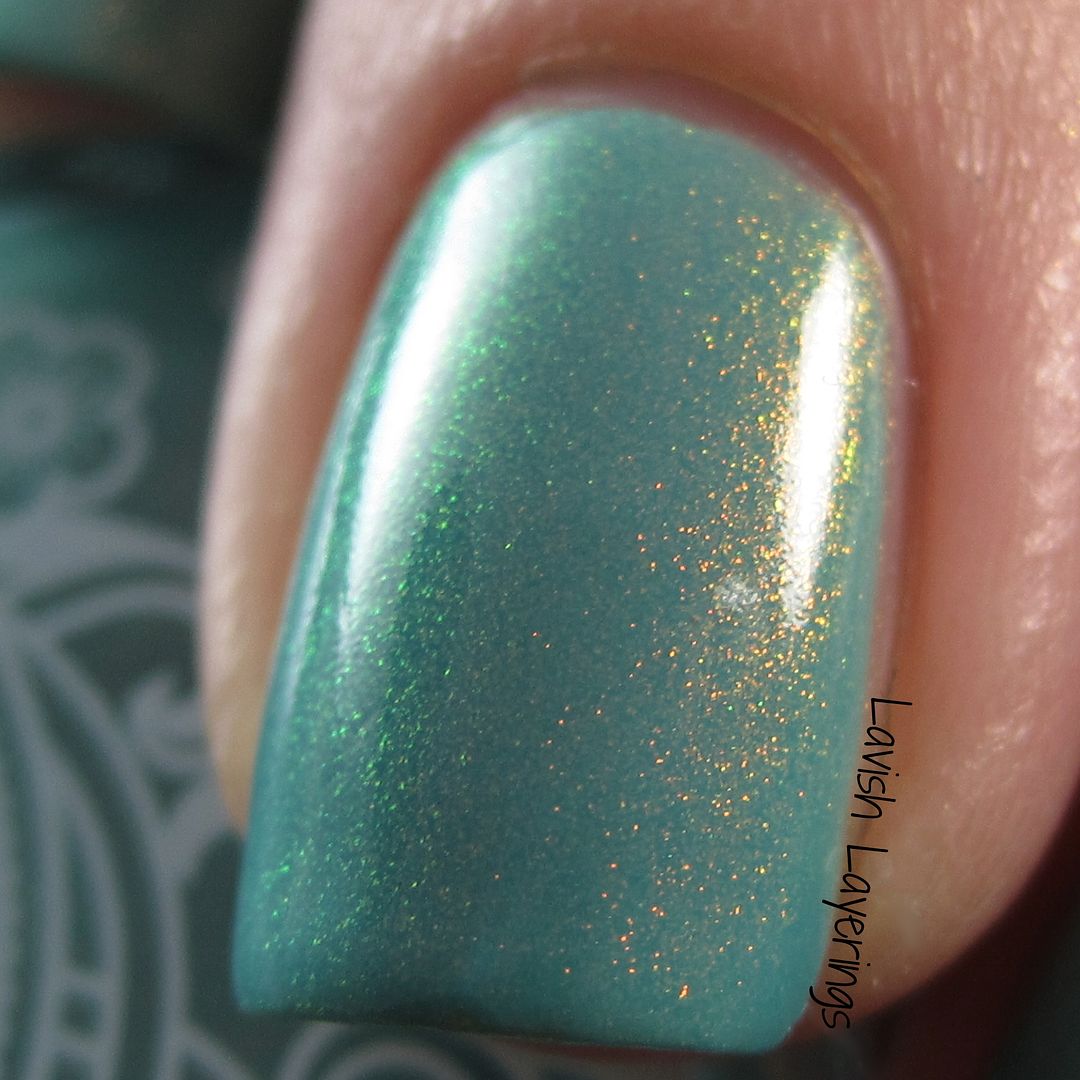
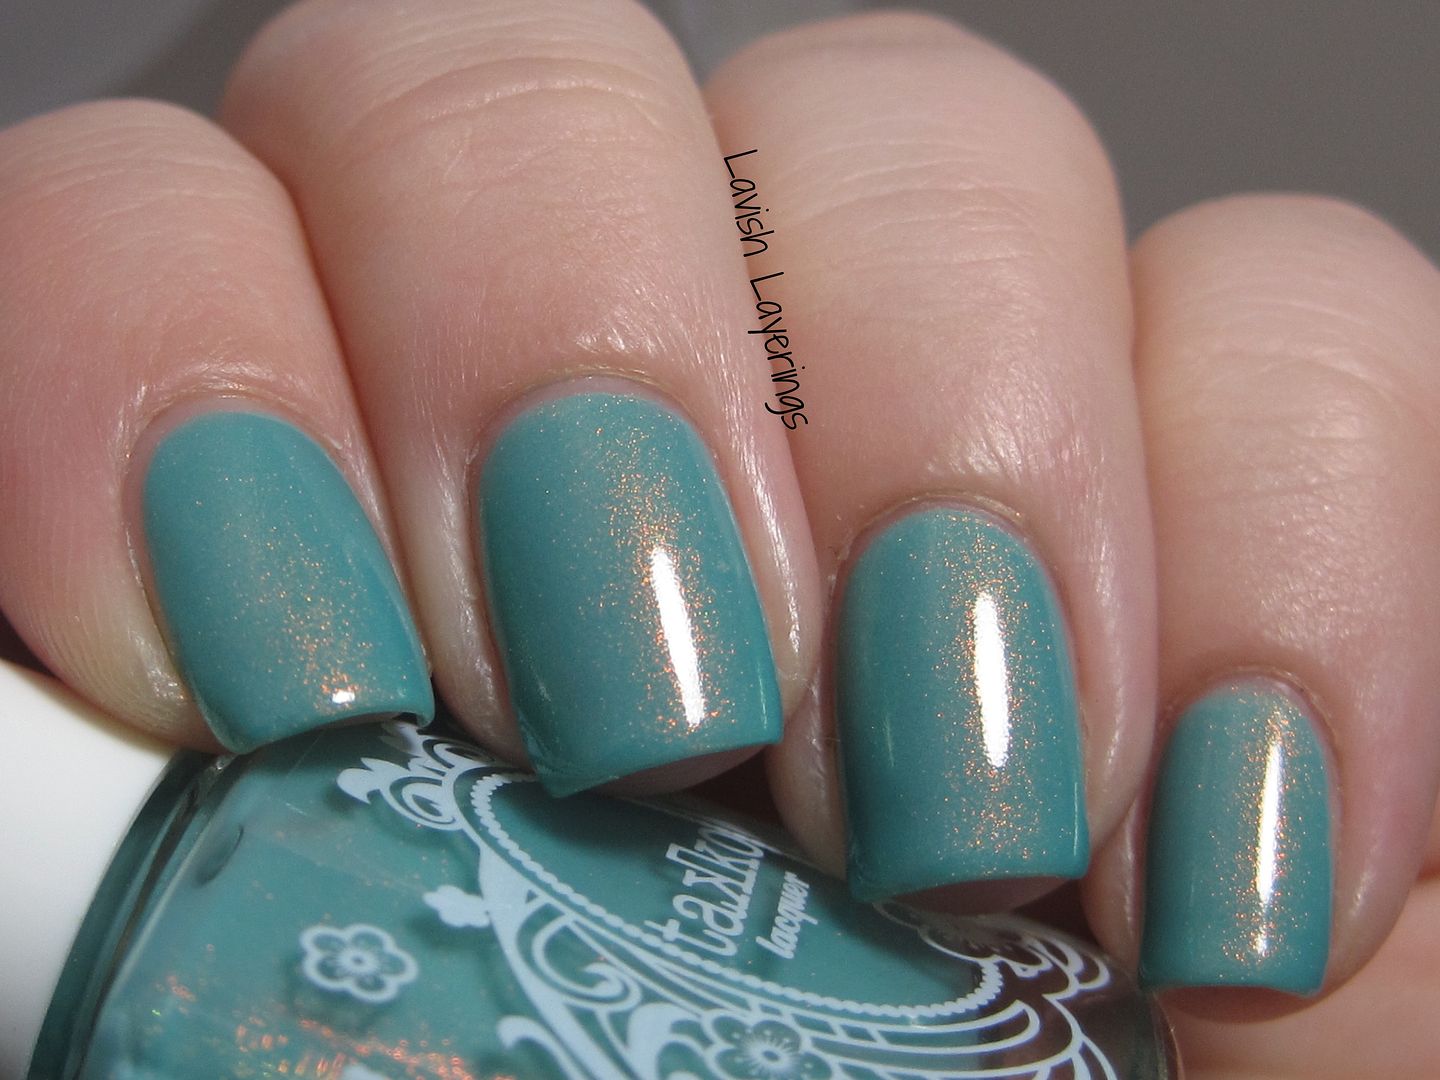
Takko Lacquer Jabberwocky is a pale aqua blue jelly filled with red/green color shifting shimmer. For being a light colored jelly, it was surprisingly opaque. I did used thicker coats, but I could have probably gotten away with 2 coats, but I did one final thinner coat for good measure. Pictures showed VNL just a tad, but it wasn't perceptible in real life. The formula was thicker, but in a good way because sometimes jellies can run and pool. The shimmer is gorgeous and there is a green shift, but only in certain lights (it's not as dramatic since it's paired with a light color. All in all, I really love this polish! I can't wait to try the other Takkos I've acquired now!
Takko Lacquer can be purchased from their shop as well as from Llarowe and Mei Mei's Signatures. You can also see updates from Takko Lacquer on Twitter, Instagram, and Facebook.
So what do you think of Jabberwocky? Do you have any Takkos? Thanks for looking everyone and have a good day! Callooh! Callay! (and if you get that...you are a huge nerd too!)
Tuesday, January 27, 2015
Pretty & Polished Dark Arts Collection (Partial)
*Press Samples*
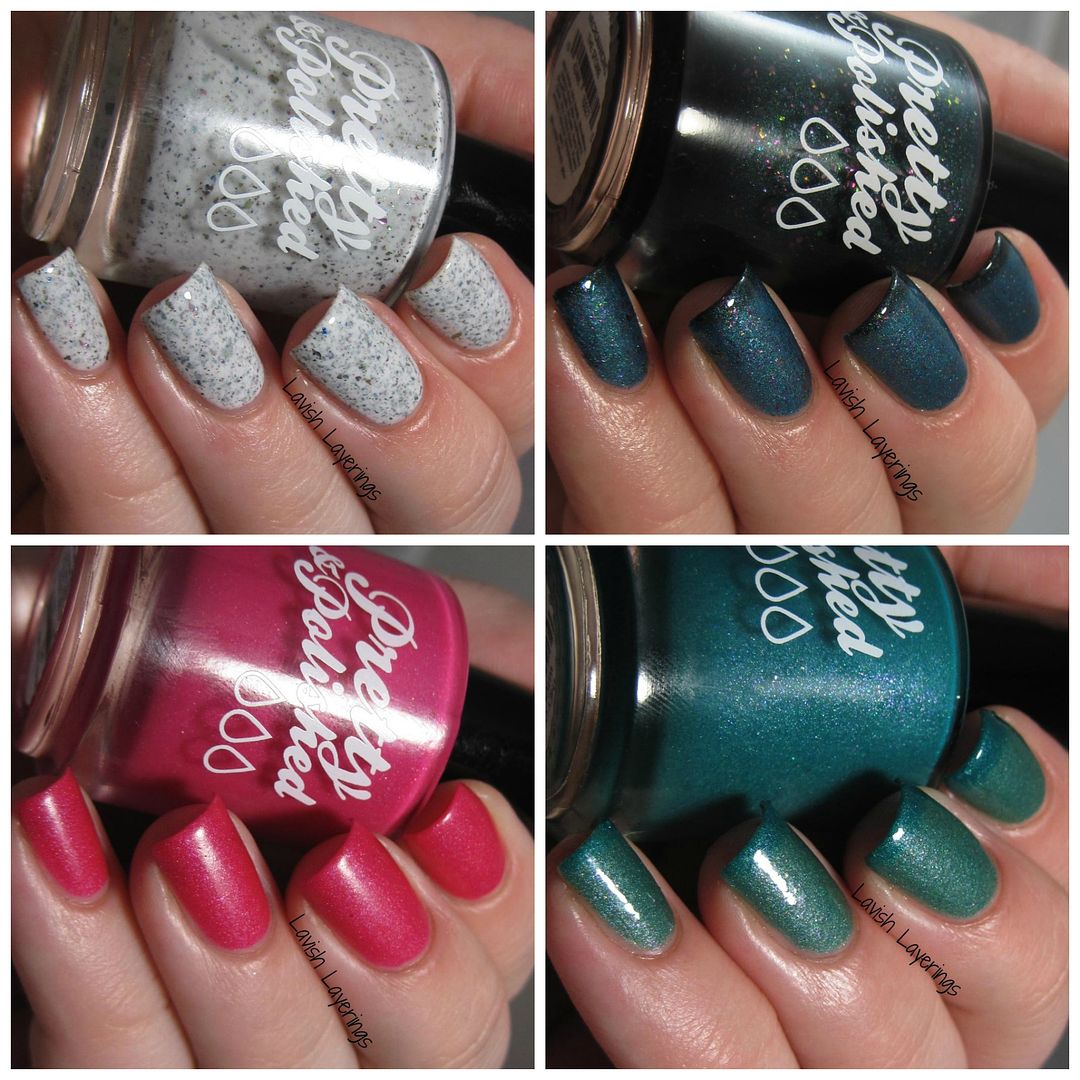
Hi everyone! Today I have four polishes to share with you from Pretty & Polished's Dark Arts Collection. I love this collection so much and one of the things that I find the most fun about it is that it really feels like Chels got out her secret potions and pigments in her lab to create this mysterious and magical set of polishes because they all have one or more special properties (color changings, glow-in-the-dark, matte, duochrome flakes). Well let's check them out!
Hi everyone! Today I have four polishes to share with you from Pretty & Polished's Dark Arts Collection. I love this collection so much and one of the things that I find the most fun about it is that it really feels like Chels got out her secret potions and pigments in her lab to create this mysterious and magical set of polishes because they all have one or more special properties (color changings, glow-in-the-dark, matte, duochrome flakes). Well let's check them out!
Monday, January 26, 2015
Zoya Naturel Satins
*Press Samples*
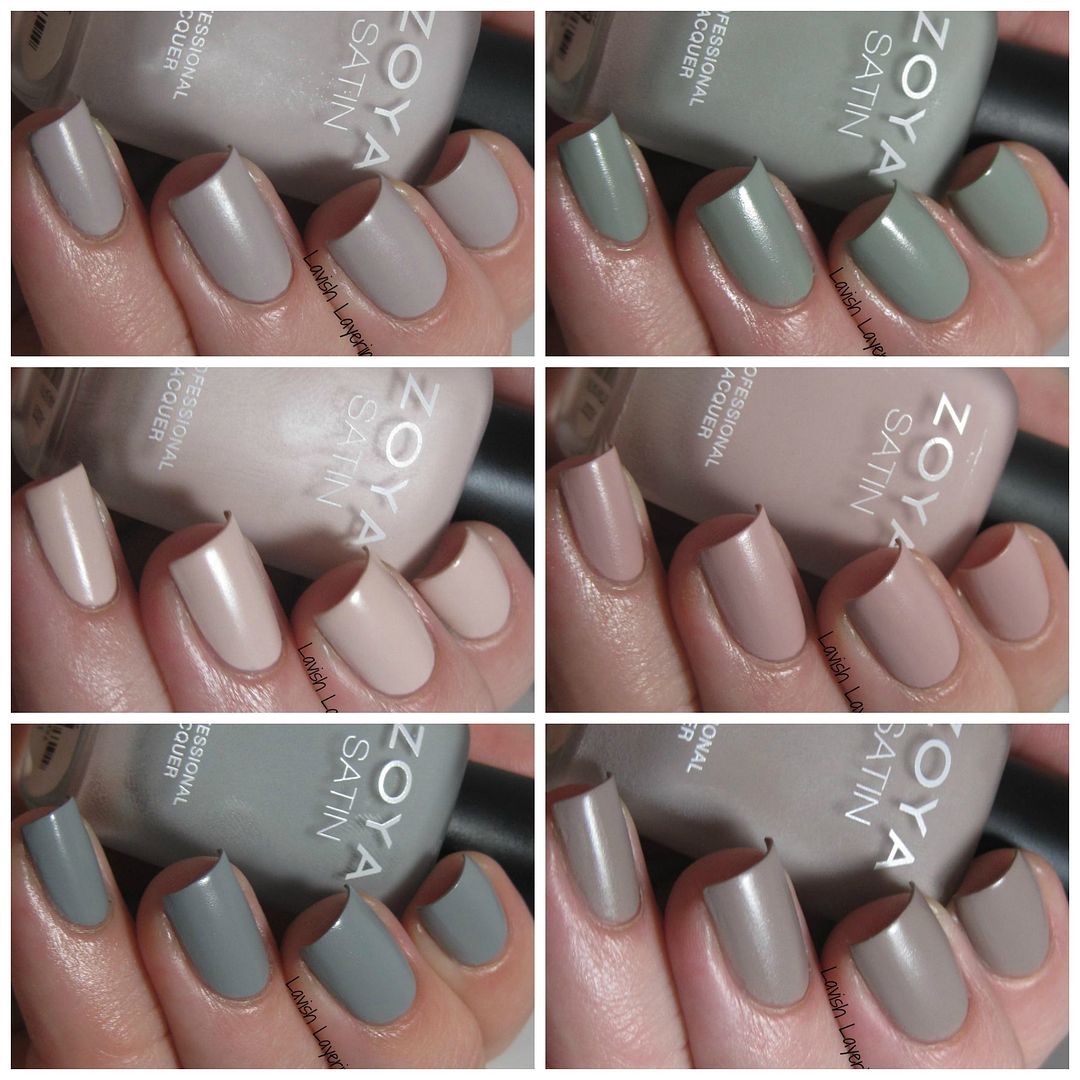
Hi everyone! Today I have Zoya's Naturel Satin Collection to share with you! This is a collection of six neutrals with a satin finish. I think some people might have been expecting a full matte finish with these polishes, but I think the easiest way to explain it is to think of them in terms of paint finishes. Flat or matte paint finishes have no sheen and don't reflect light at all, while satin paint finishes have just the slightest hint of sheen which softens them up a bit, and that is exactly what you see with Zoya's Satin finish.
Hi everyone! Today I have Zoya's Naturel Satin Collection to share with you! This is a collection of six neutrals with a satin finish. I think some people might have been expecting a full matte finish with these polishes, but I think the easiest way to explain it is to think of them in terms of paint finishes. Flat or matte paint finishes have no sheen and don't reflect light at all, while satin paint finishes have just the slightest hint of sheen which softens them up a bit, and that is exactly what you see with Zoya's Satin finish.
Friday, January 23, 2015
Pahlish Warmest Winter January Duo
*Press Samples*
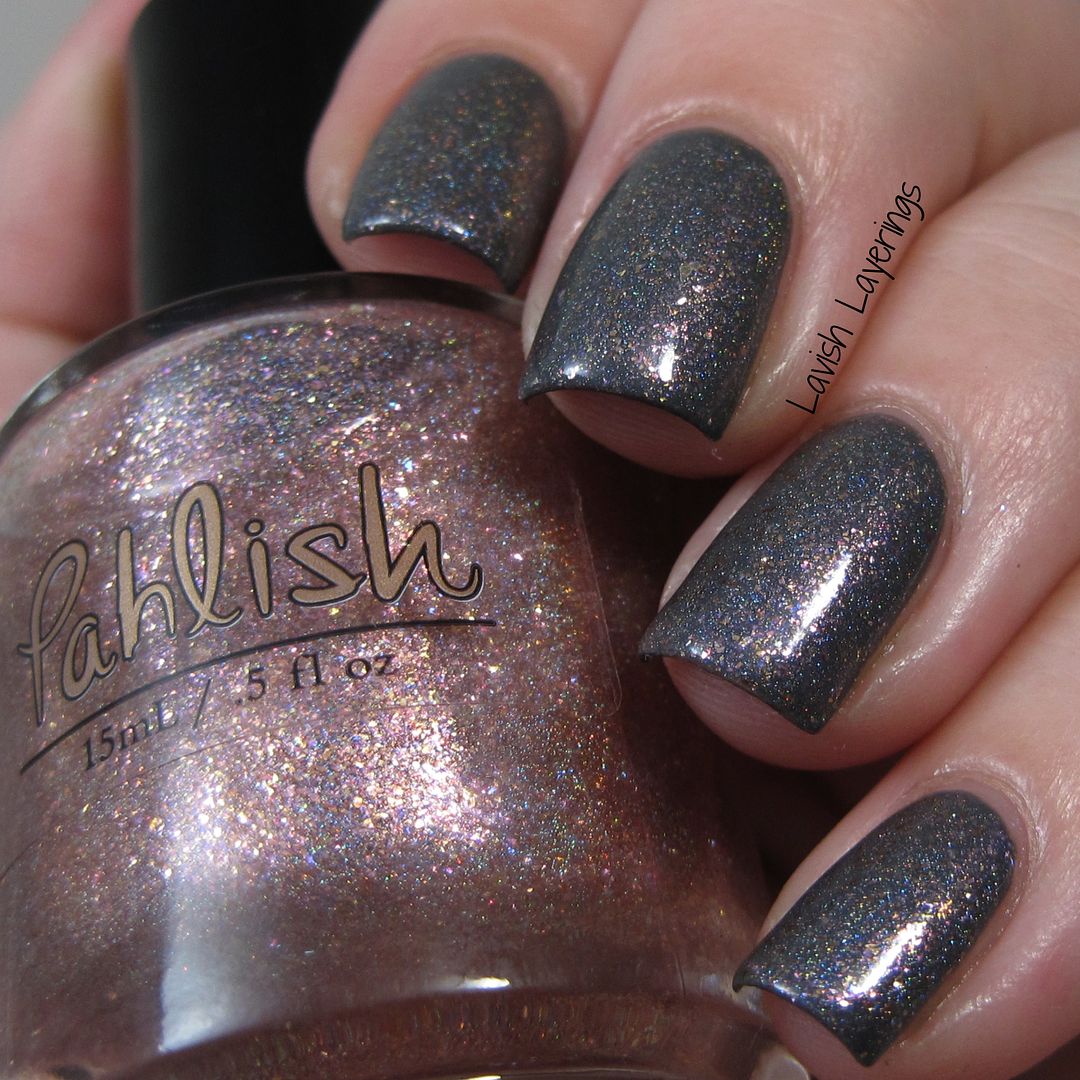
Hi everyone! Today I have the gorgeous Pahlish "Warmest Winter" January Duo to share with you! This duo is even more amazing in person than I thought it would be. Pahlish usually has a glitter topper in their duos, but this time, it's a holo topper filled with flake shimmer that you could layer over tons of things for a gorgeous effect. I know this duo is being restocked tonight and probably next Friday too since it is the last Friday of January, but it will only be available through the end of January so be sure to grab it while you can!
Hi everyone! Today I have the gorgeous Pahlish "Warmest Winter" January Duo to share with you! This duo is even more amazing in person than I thought it would be. Pahlish usually has a glitter topper in their duos, but this time, it's a holo topper filled with flake shimmer that you could layer over tons of things for a gorgeous effect. I know this duo is being restocked tonight and probably next Friday too since it is the last Friday of January, but it will only be available through the end of January so be sure to grab it while you can!
Wednesday, January 21, 2015
Polish Revolution Looking Glass Logic
*Purchased by Me*
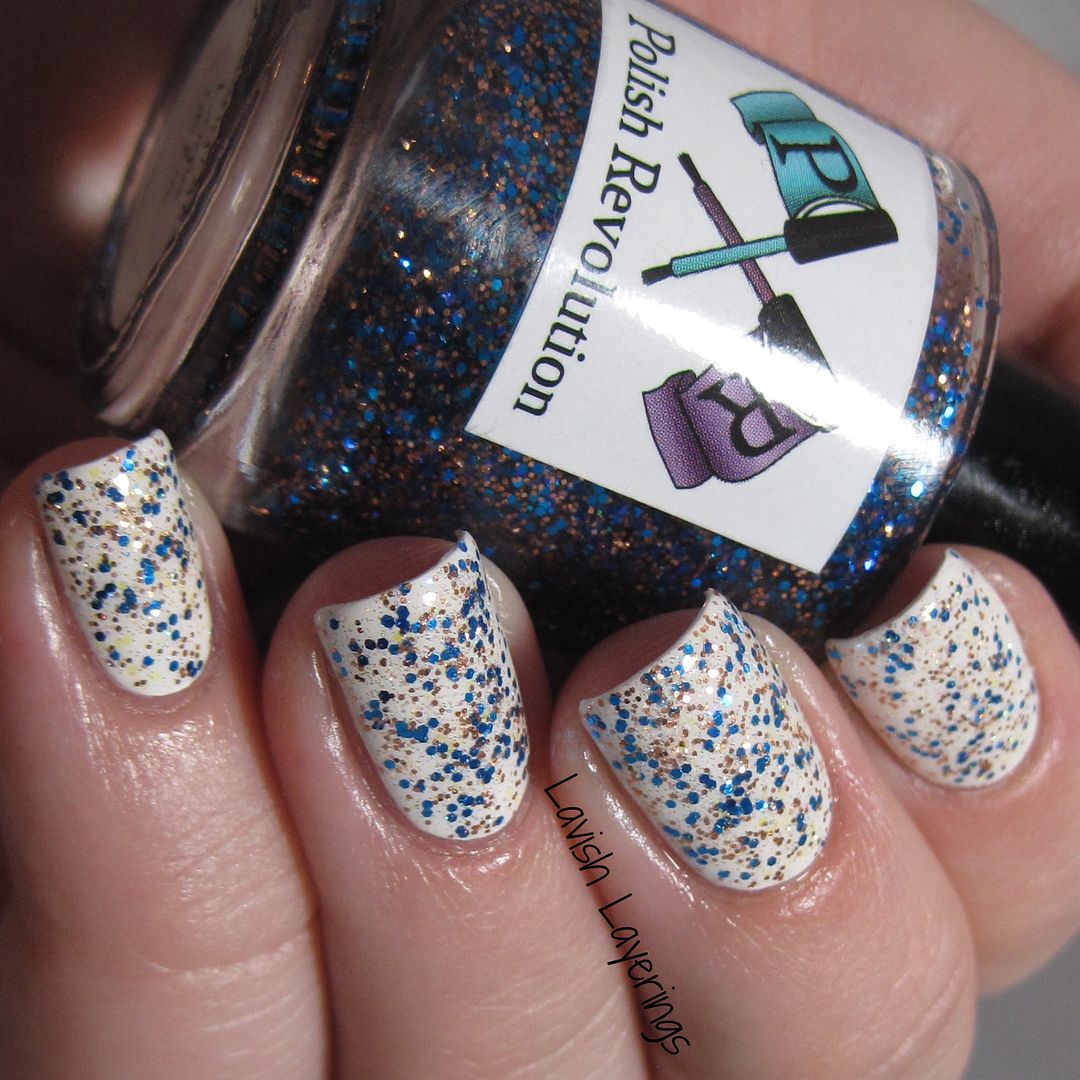
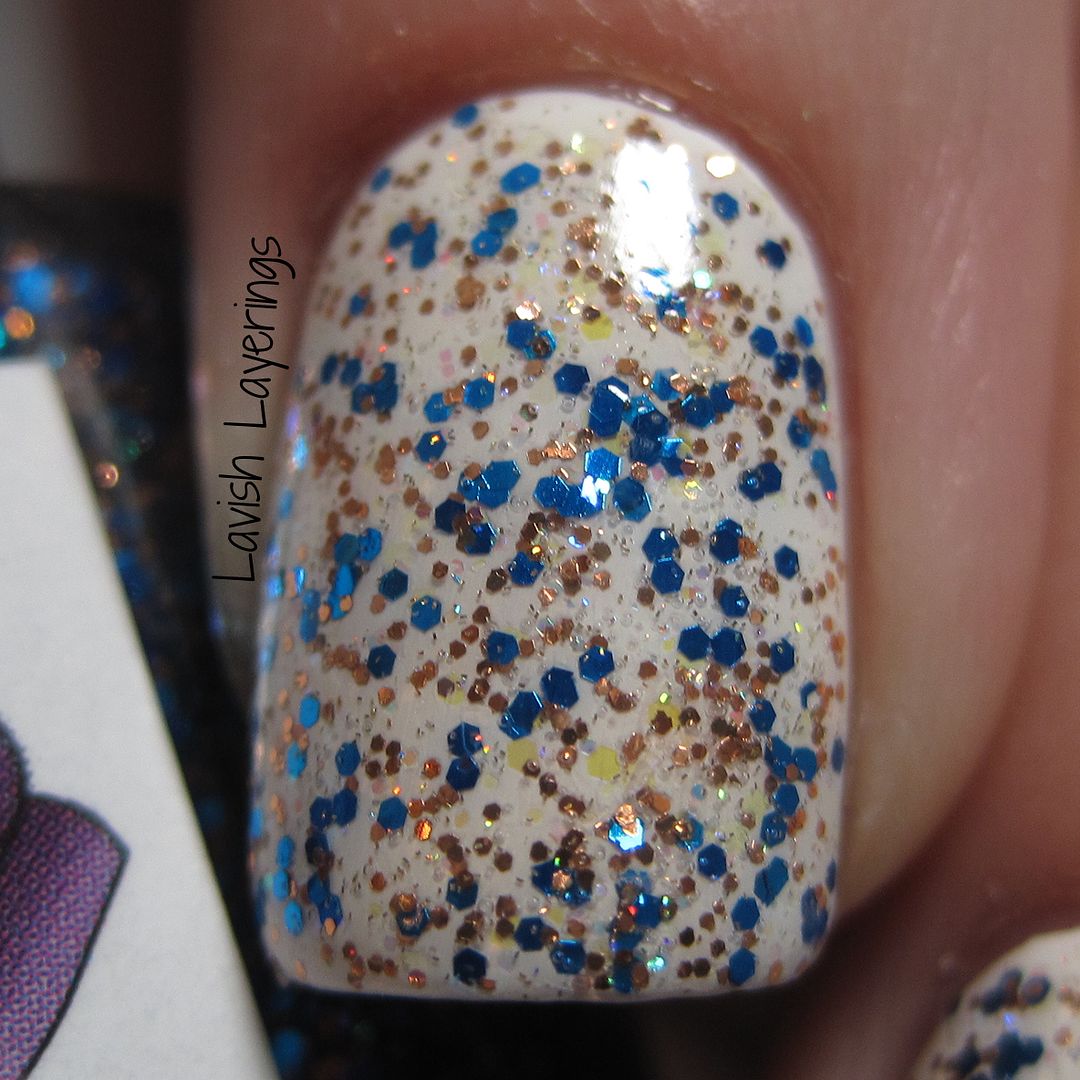
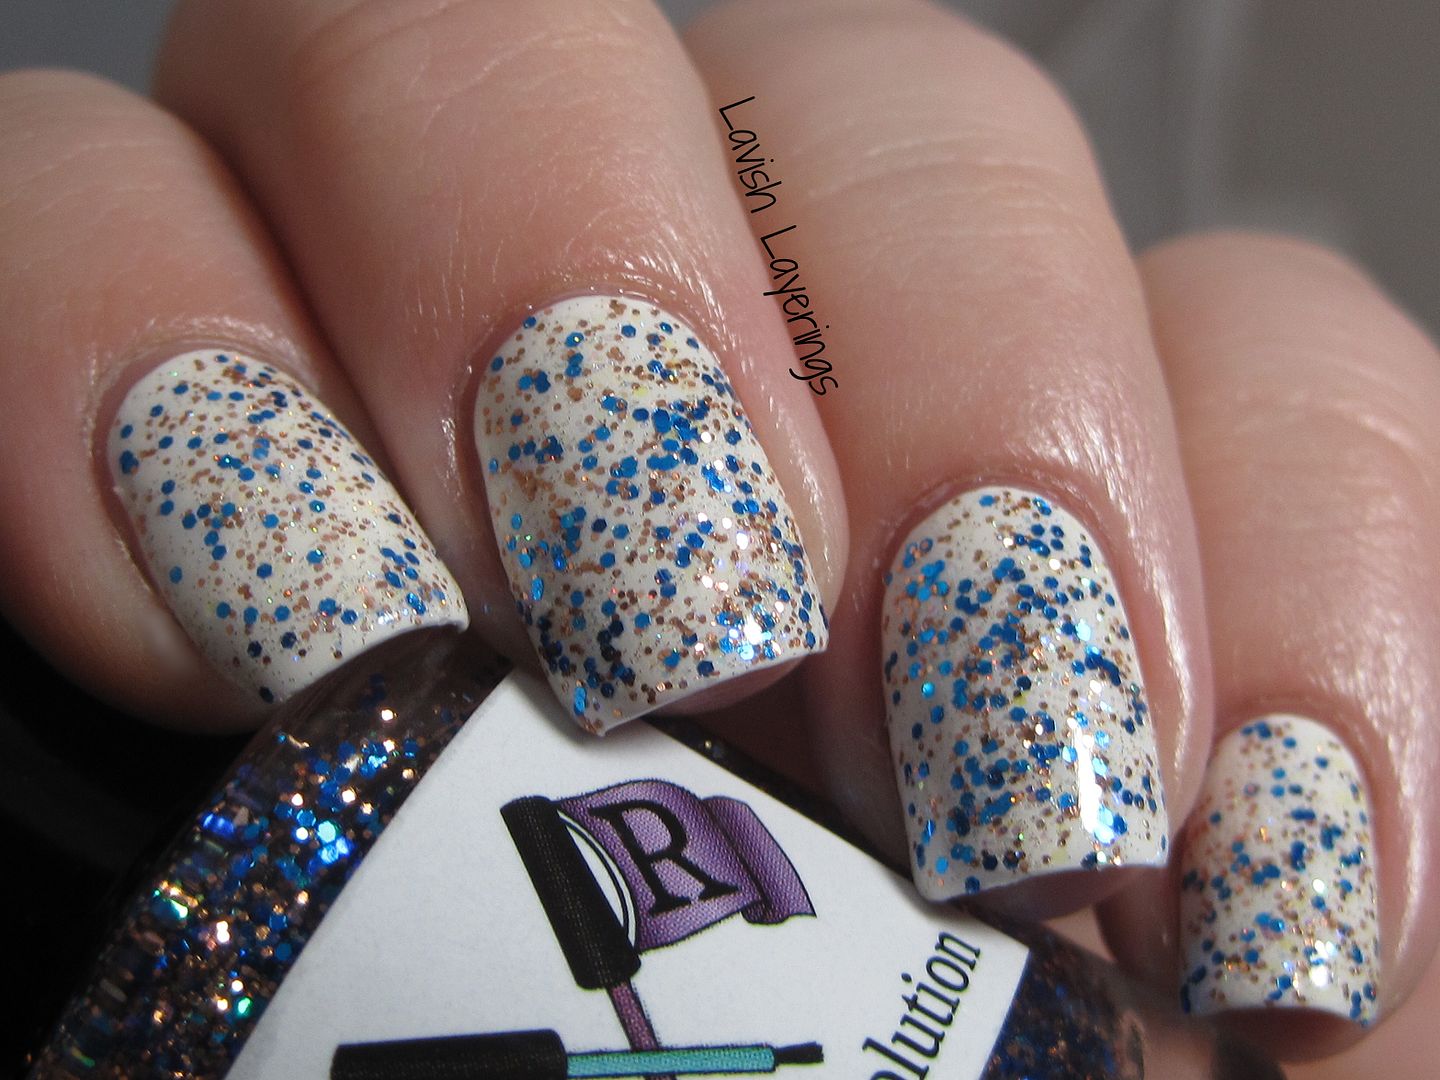
Hi everyone! Today I have a polish that I've had for aaaages that I decided to pull out for a wintry-feeling glitter mani. This idea was inspired by some beautiful pictures on Instagram that I saw by @lacquerloon and @thepolishedokie of a totally different blue glitter polish that they both swatched over a light neutral base color that really let the glitters shine, and I thought it looked so pretty! So even though this polish looks nothing like those...it was the polish that came to mind when I saw those pictures and I just had do something similar! #randommaniinspiration
Polish Revolution Looking Glass Logic is a clear-based glitter topper filled with blue, copper, and color shifting glitters. Formula was excellent with a good glitter load and it spread easily. For this mani, I layered 1 coat of Looking Glass Logic over a white creme. Then, for even MORE sparkle, I added one coat of Northern Lights Gold topcoat (super fine scattered gold holo glitter). It added just a touch more depth to the finished look that I really liked. I had to fight the urge to matte this, and I wish I had before I took it off just to see how it would have looked. Looking Glass Logic is part of Polish Revolution's Alice in Wonderland Trio (which are all gorgeous by the way) which was one of Polish Revolution's earlier releases.
Polish Revolution polishes can be found in creator Lauryn's Etsy Shop. The shop is closed right now because she is recovering from surgery, but if I remember correctly, she usually keeps the Alice in Wonderland trio in stock in her shop when it's open.
What do you think of my wintry layering? Does if feel wintry to you? Thanks for looking everyone!
Tuesday, January 20, 2015
Cupcake Polish The Queen Collection
*Press Samples*
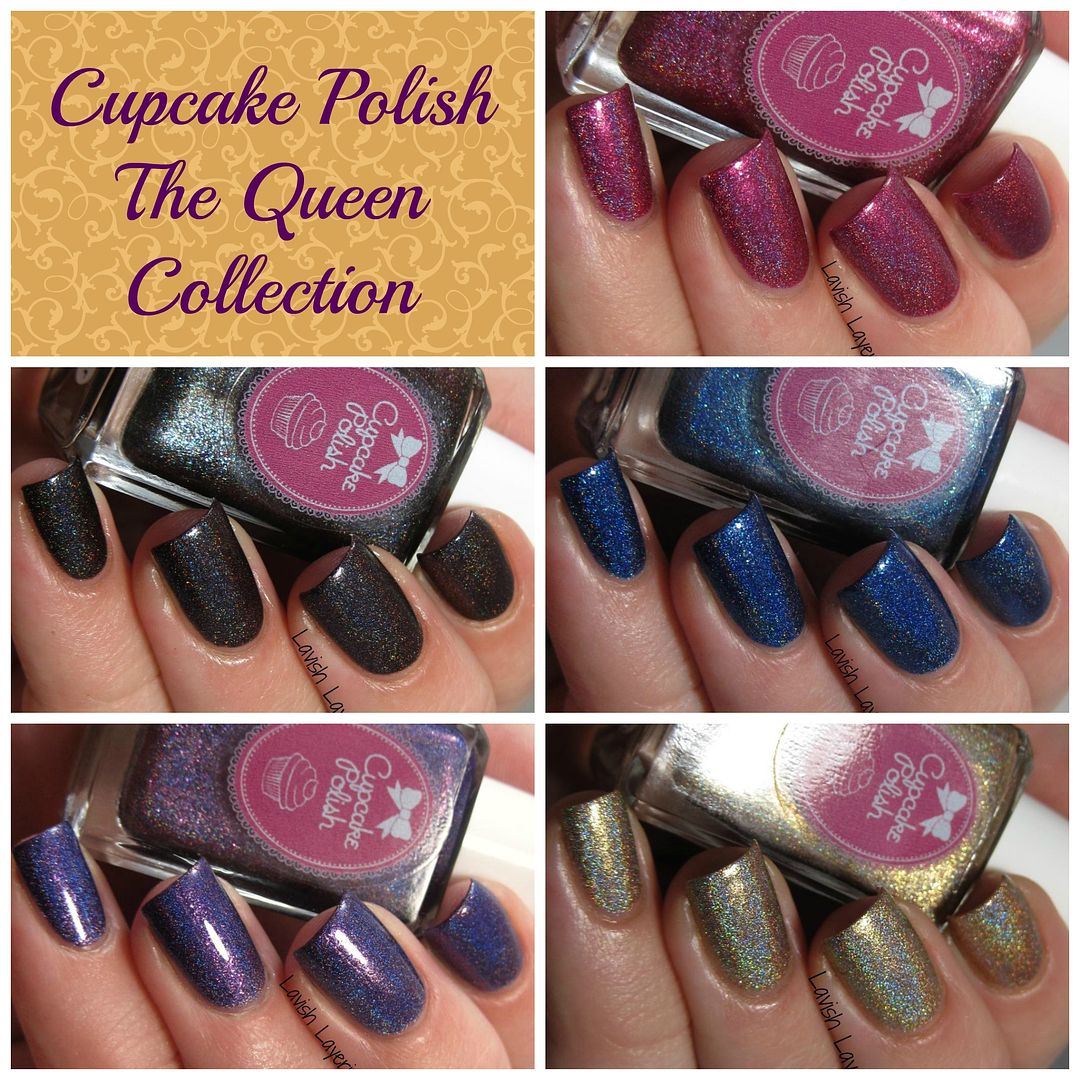
Hi everyone! Today I have The Queen Collection from Cupcake Polish to share with you. This collection was inspired by Queens from European history and consists of 5 holos that are packed with metallic shimmers in gorgeous gemstone shades. These will be available on January 22 at 10 am CST.
Hi everyone! Today I have The Queen Collection from Cupcake Polish to share with you. This collection was inspired by Queens from European history and consists of 5 holos that are packed with metallic shimmers in gorgeous gemstone shades. These will be available on January 22 at 10 am CST.
Monday, January 19, 2015
China Glaze Road Trip Collection (My Picks)
*Purchased by Me*
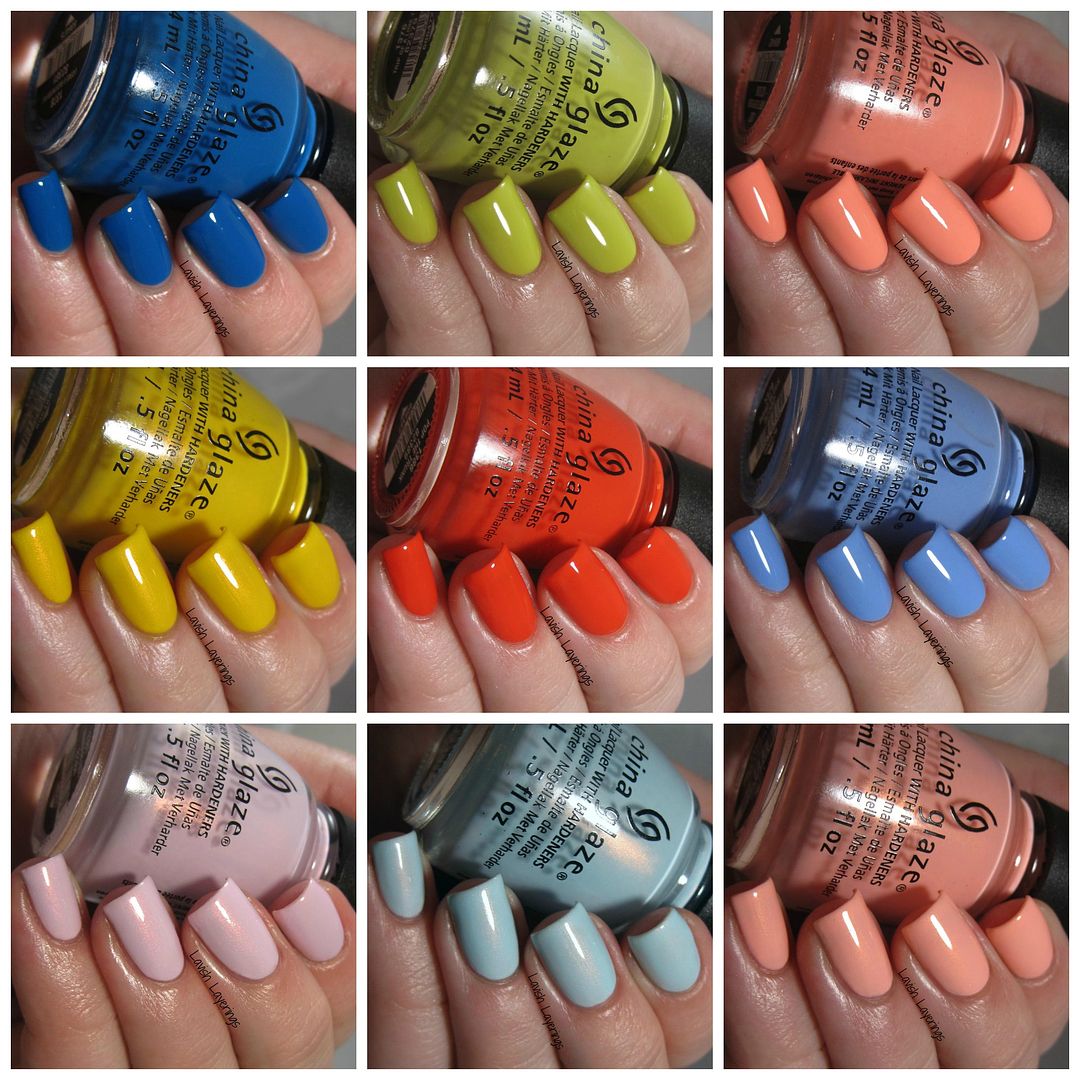
Hi everyone! Today I have 9 of the 12 new Spring 2015 shades from China Glaze's Road Trip Collection. I must say, though there have been a few individual shades from China Glaze that I have liked recently, but I can't remember the last time an entire China Glaze collection excited me so much! I saw Love Varnish's amazing swatches of this collection and I immediately ordered 6 of them (all of the shimmers and 2 of the crellys) and then promptly picked up 3 more of the crellys at Ulta. I can really appreciate something simple that is done well, and that is what this collection is. There are 3 more crellys that I did not get, but I may get them too before it's all said and done.
Hi everyone! Today I have 9 of the 12 new Spring 2015 shades from China Glaze's Road Trip Collection. I must say, though there have been a few individual shades from China Glaze that I have liked recently, but I can't remember the last time an entire China Glaze collection excited me so much! I saw Love Varnish's amazing swatches of this collection and I immediately ordered 6 of them (all of the shimmers and 2 of the crellys) and then promptly picked up 3 more of the crellys at Ulta. I can really appreciate something simple that is done well, and that is what this collection is. There are 3 more crellys that I did not get, but I may get them too before it's all said and done.
Friday, January 16, 2015
Guest Post for Shelby Lou Nails!
Hi everyone! Today I'm guest posting over at Shelby Lou Nails! Shelby is just a sweetheart and her blog is awesome so I'm so glad I got to post for her today! Be sure to check it out and check out her blog!
Follow this link to see the post!
Thanks for looking everyone!
Follow this link to see the post!
Thanks for looking everyone!
Thursday, January 15, 2015
Thyroid Disease Awareness Mani
*Nothing to Disclose*
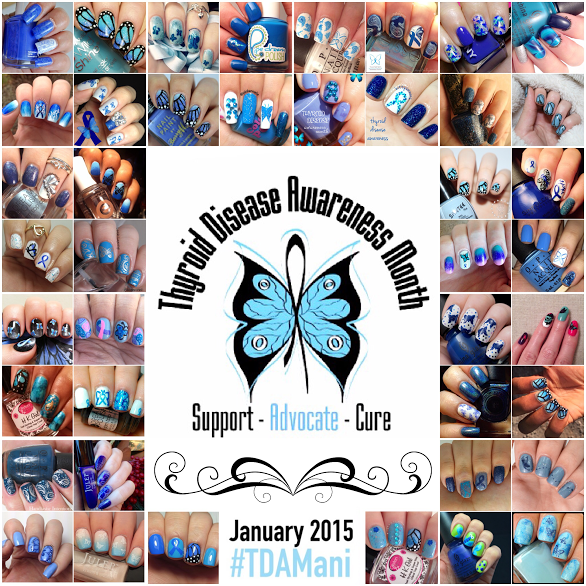
Hi everyone! Today I have a special event to share with for you! @citruseyes on Instagram recently organized a group of nail artists to bring awareness to a topic that is very near and dear to her heart: Thyroid Disease. We were each tasked to create a mani this January for Thyroid Disease Awareness Month to share on Instagram. During the month of January, you can participate on Instagram by creating your very own mani!
Here are some instructions from @citruseyes for participating in the event on Instagram during the month of January:
Here is some more information from @citruseyes about Thyroid Disease to increase our knowledge:
So, if any of you want to participate this month to help raise awareness for Thyroid Disease, please use #TDAMani on Instagram so everyone can see your work! Thanks again to @citruseyes for asking me to participate in this event! Thanks for looking everyone!
Hi everyone! Today I have a special event to share with for you! @citruseyes on Instagram recently organized a group of nail artists to bring awareness to a topic that is very near and dear to her heart: Thyroid Disease. We were each tasked to create a mani this January for Thyroid Disease Awareness Month to share on Instagram. During the month of January, you can participate on Instagram by creating your very own mani!
Here are some instructions from @citruseyes for participating in the event on Instagram during the month of January:
To share your thyroid disease awareness mani or to see the beautiful works above up close, use the hashtag #TDAMani - Symbols for thyroid disease awareness are: blue, paisley design, and the butterfly.
Nails above include works from:
@fervnails @nailsbymercedes@miaonoirnails @krbnails @nailkazam @nails_by_xoch @vickylovesnails @pinkannelie @isaisis97@_nailsbymeg @tinseltownnails @amina2inspire @nanazcheekz @bittysweens @pinkyboonails@polishisthenewblack @journailism @mvargas_nails @procrastinailart @nailingthatpolish@thegirlyengineer @hashtagnailpolish @astoldbyannalisa @caribbeancuticles @ilysespieces@prestonails @mypolishedtips13 @littlepandapit @clairelofthouse @thepolishedphd @marshinis.nails@bostonmerlin10 @handtasticintentions @xiii_lacquer @emismanis @courtneydoeshernails@cmlovesnails @npadd1 @anonymouspolish @pikapolish @b_jessica_3 @citruseyes
Here is some more information from @citruseyes about Thyroid Disease to increase our knowledge:
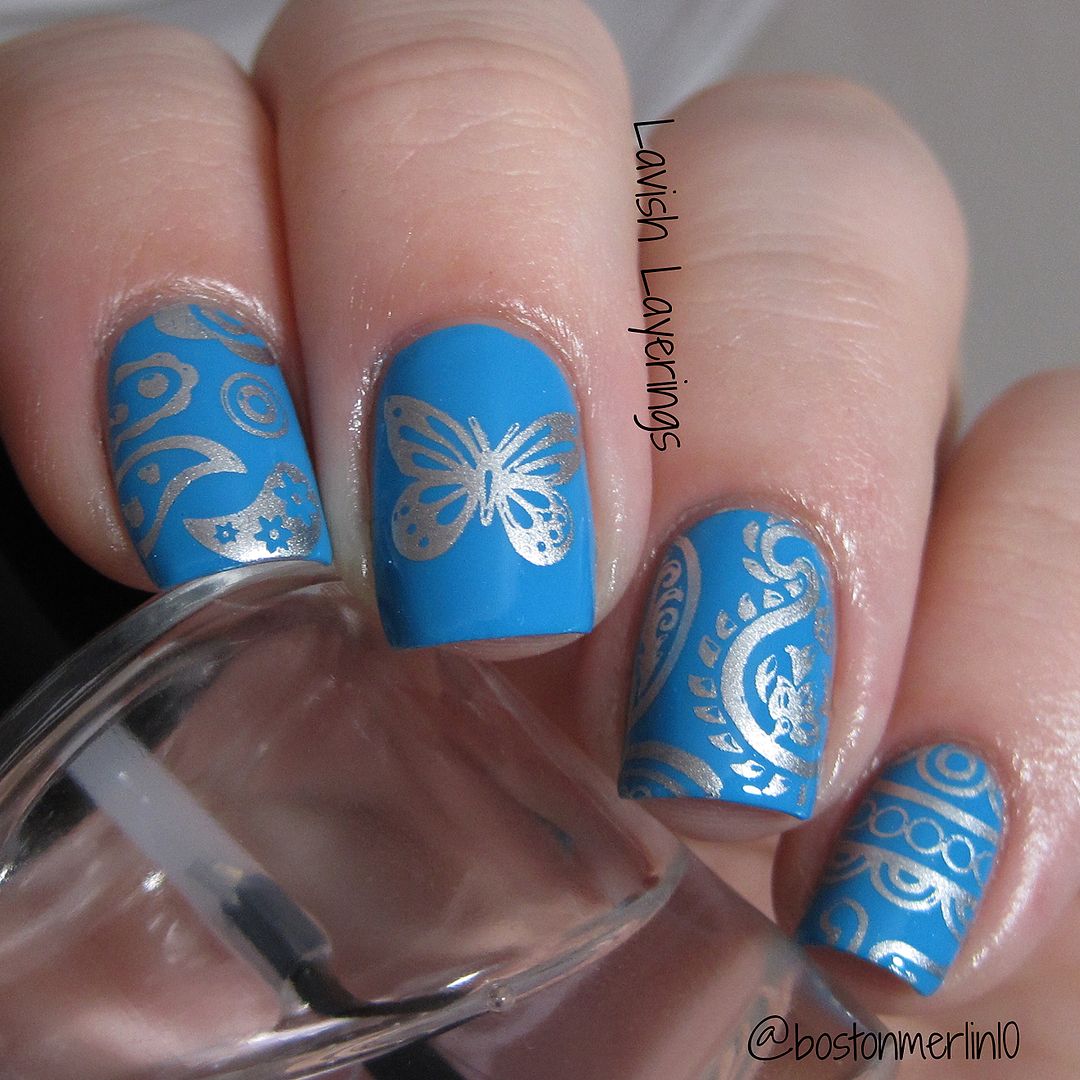
For my mani, I started with a base of Illamasqua Noble (my all-time favorite blue creme). Then, using the symbols for Thyroid Disease Awareness, I added a butterfly on my middle finger (unnamed plate) and paisley patterns on my other fingers (MoYou-London Fashionista plate 11...which is a STUNNING plate). The silver I used to stamp was China Glaze Millennium. Overall, I was really pleased with how cohesive this skittle mani looked! That Mo-You plate has so many pretty paisley designs that it was hard to choose!January is thyroid disease awareness month and several nail artists have collaborated in order to spread awareness. The thyroid is the butterfly shaped gland located in the neck that is responsible for releasing hormones that regulate growth and metabolism. Some examples of thyroid diseases include: Hashimoto's thyroiditis, Graves' disease, thyroid cancer, and postpartum thyroiditis (but there are more); thyroid conditions related to these disease are hypothyroidism or hyperthyroidism.There are no cures for most thyroid diseases but there are various treatments available such as surgery, medication, hormone replacement, and lifestyle modifications. Often times, patients may not “look” physically sick but are still in pain and suffer regularly. For more information on some of these diseases, please continue reading onto the next caption.Hypothyroidism is a condition when thyroid hormone levels are low and can be caused by the autoimmune disease Hashimoto’s thyroiditis, radiation therapy, or thyroid removal due to cancer or hyperthyroidism. Symptoms may include: fatigue, lethargy, puffy face, constipation, weight gain despite poor appetite, cold insensitivity, dry skin, slower heartbeat, and more. It can lead to a fatal condition known as myxedema coma if hypothyroidism is not treated and becomes long standing. Babies born with congenital hypothyroidism risk mental retardation and growth delays.Hyperthyroidism is the opposite: it is when thyroid hormone levels are high. It is oftentimes caused by the autoimmune disorder Graves' disease but can also result from toxic multinodular goiter or thyroid adenoma. Symptoms may include: anxiety, increased irritability, diarrhea, weight loss despite increased appetite, heat insensitivity, hand tremors, insomnia, rapid heartbeat, and more. It can lead to a fatal condition known as thyroid storm if hyperthyroidism is not treated properly. Thyroid storm can lead to heart failure, irregular heartbeats, and death.Thyroid cancer, like other forms of cancer, needs to be detected early in order for early treatments to increase the chances of survival and decrease the chances of complications. Symptoms may include: a swollen throat, pain, difficulties swallowing, hoarse voice, and feeling a lump present on the throat.Some thyroid issues can also occur post pregnancy. Postpartum thyroiditis is when the thyroid becomes inflamed after childbirth. Symptoms can either be hypothyroid-related or hyperthyroid-related symptoms. In mild cases, treatment may not be necessary, but in some cases, patients can develop chronic hypothyroidism.
So, if any of you want to participate this month to help raise awareness for Thyroid Disease, please use #TDAMani on Instagram so everyone can see your work! Thanks again to @citruseyes for asking me to participate in this event! Thanks for looking everyone!
Wednesday, January 14, 2015
Elevation Polish Rose Cardamom Chocolate Truffles for February's A Box, Indied
*Press Sample*
Hi everyone! Today I have the Elevation Polish exclusive for February's A Box, Indied to share with you. The theme of this box is "A Box, Candied", so all of the polishes are candy-themed. The other contributors to this box are Hare Polish, CrowsToes Nail Color, Serum No. 5, and Black Cat Lacquers. February's box will launch on January 26 at 12 PM and 7 PM Mountain time. Keep a watch on Llarowe's Facebook page to see the offerings from the other contributors to the box!
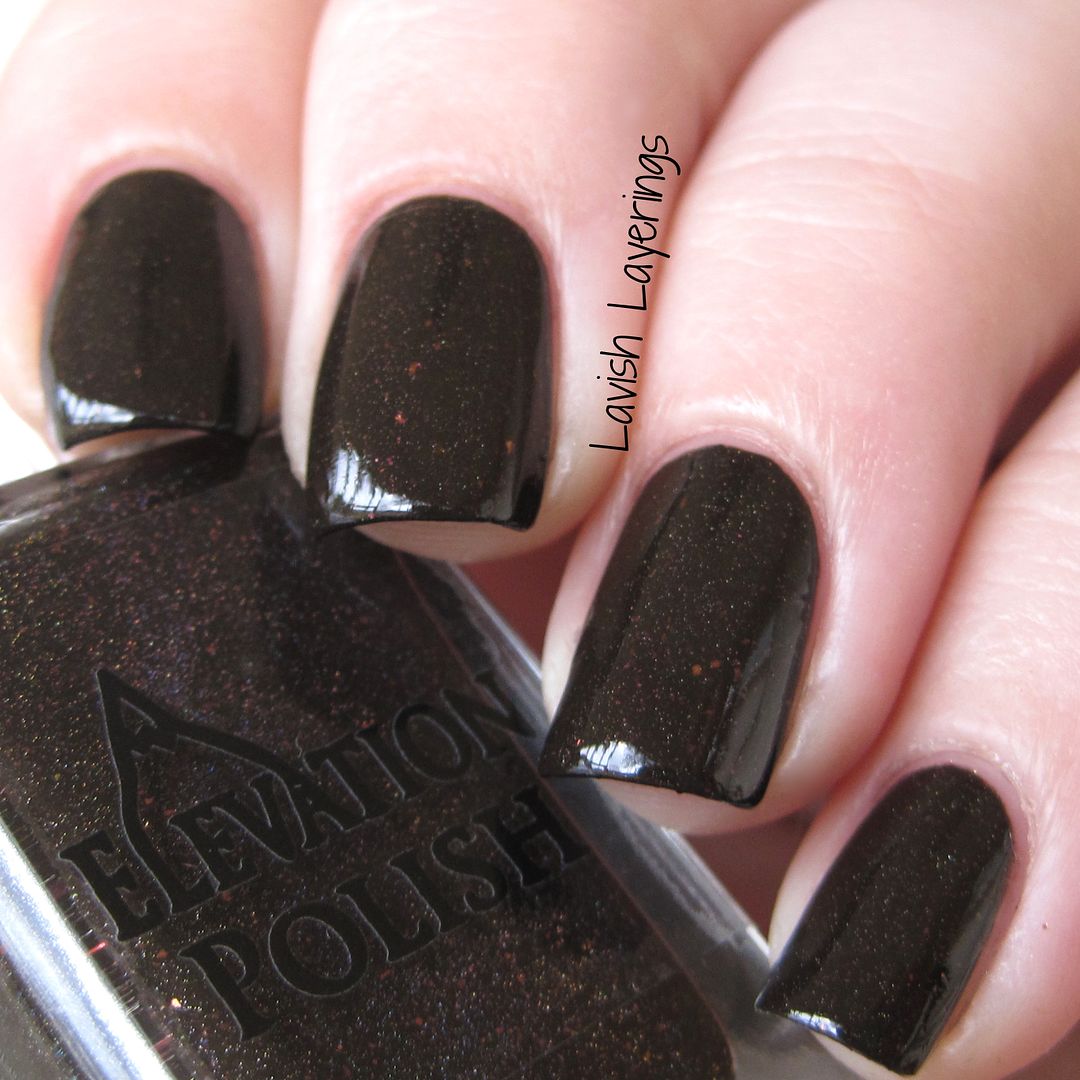
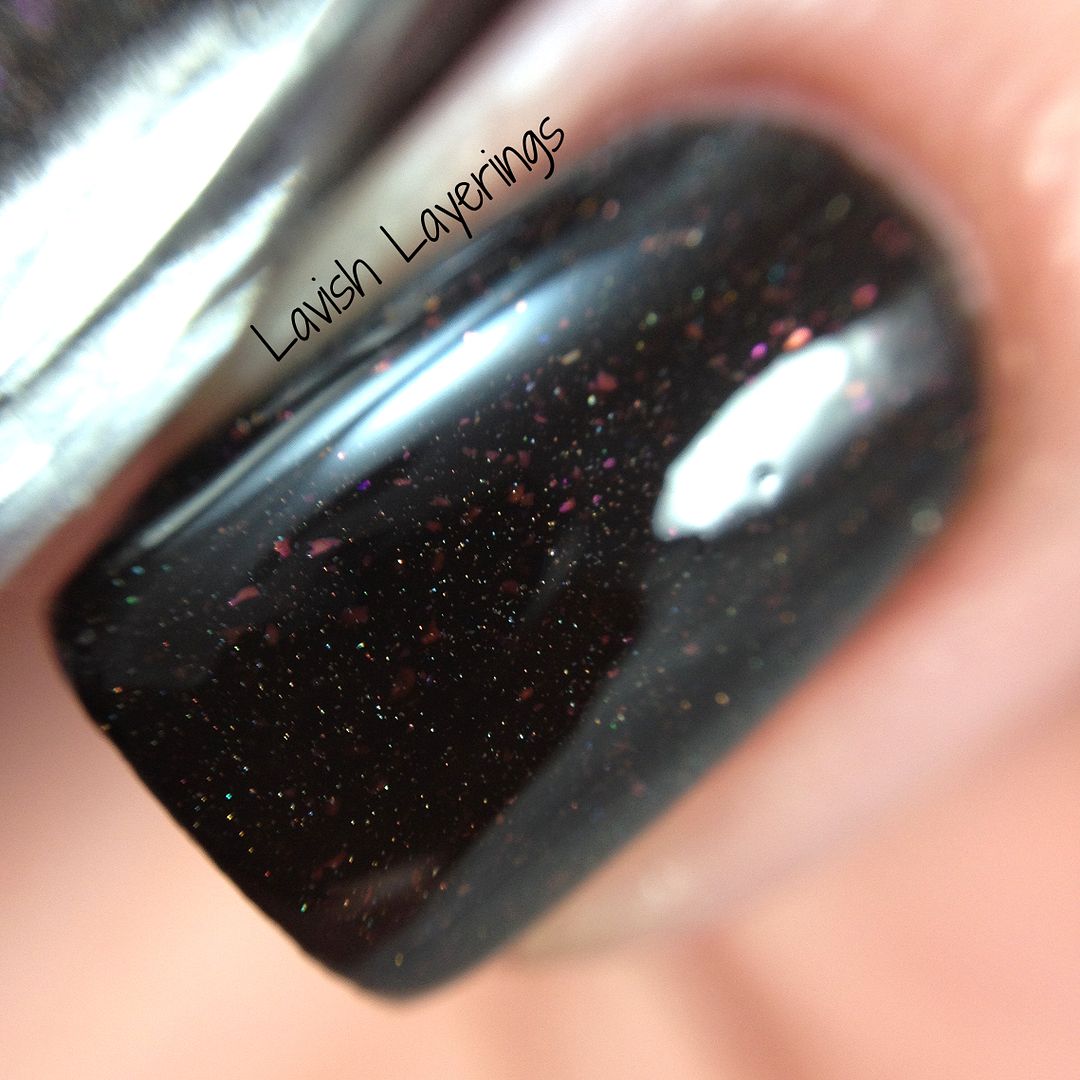
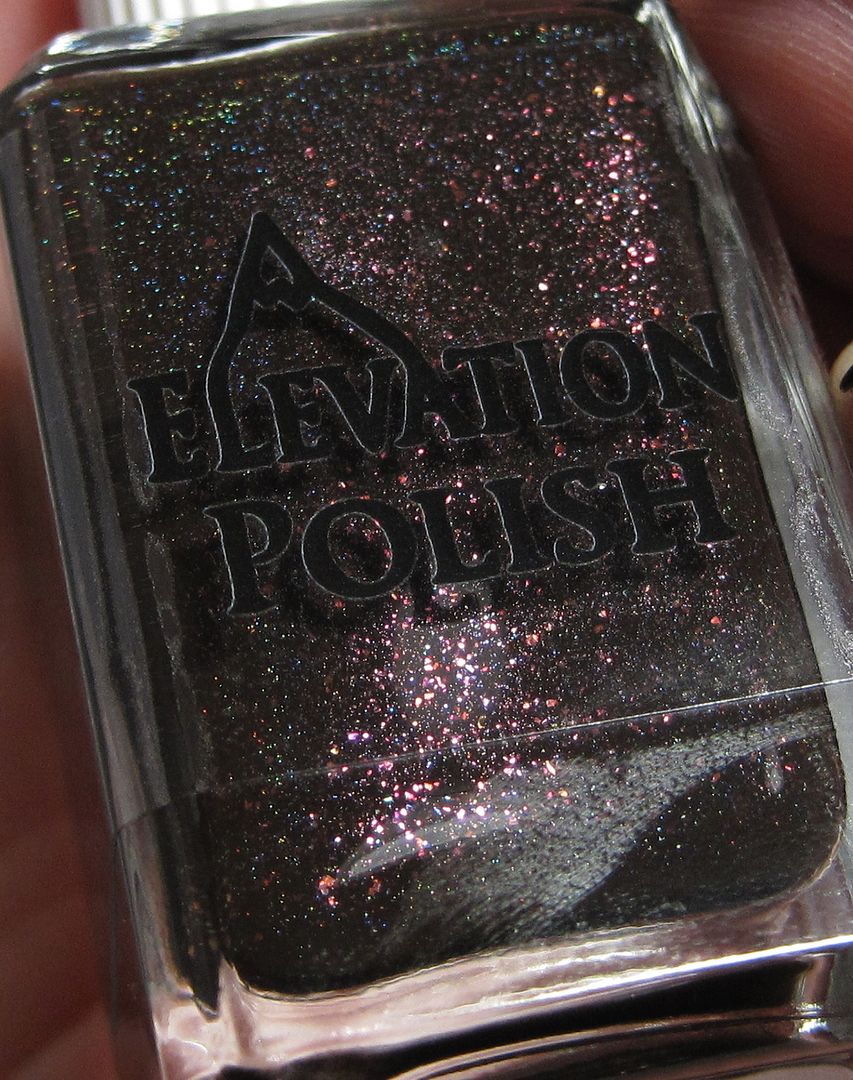
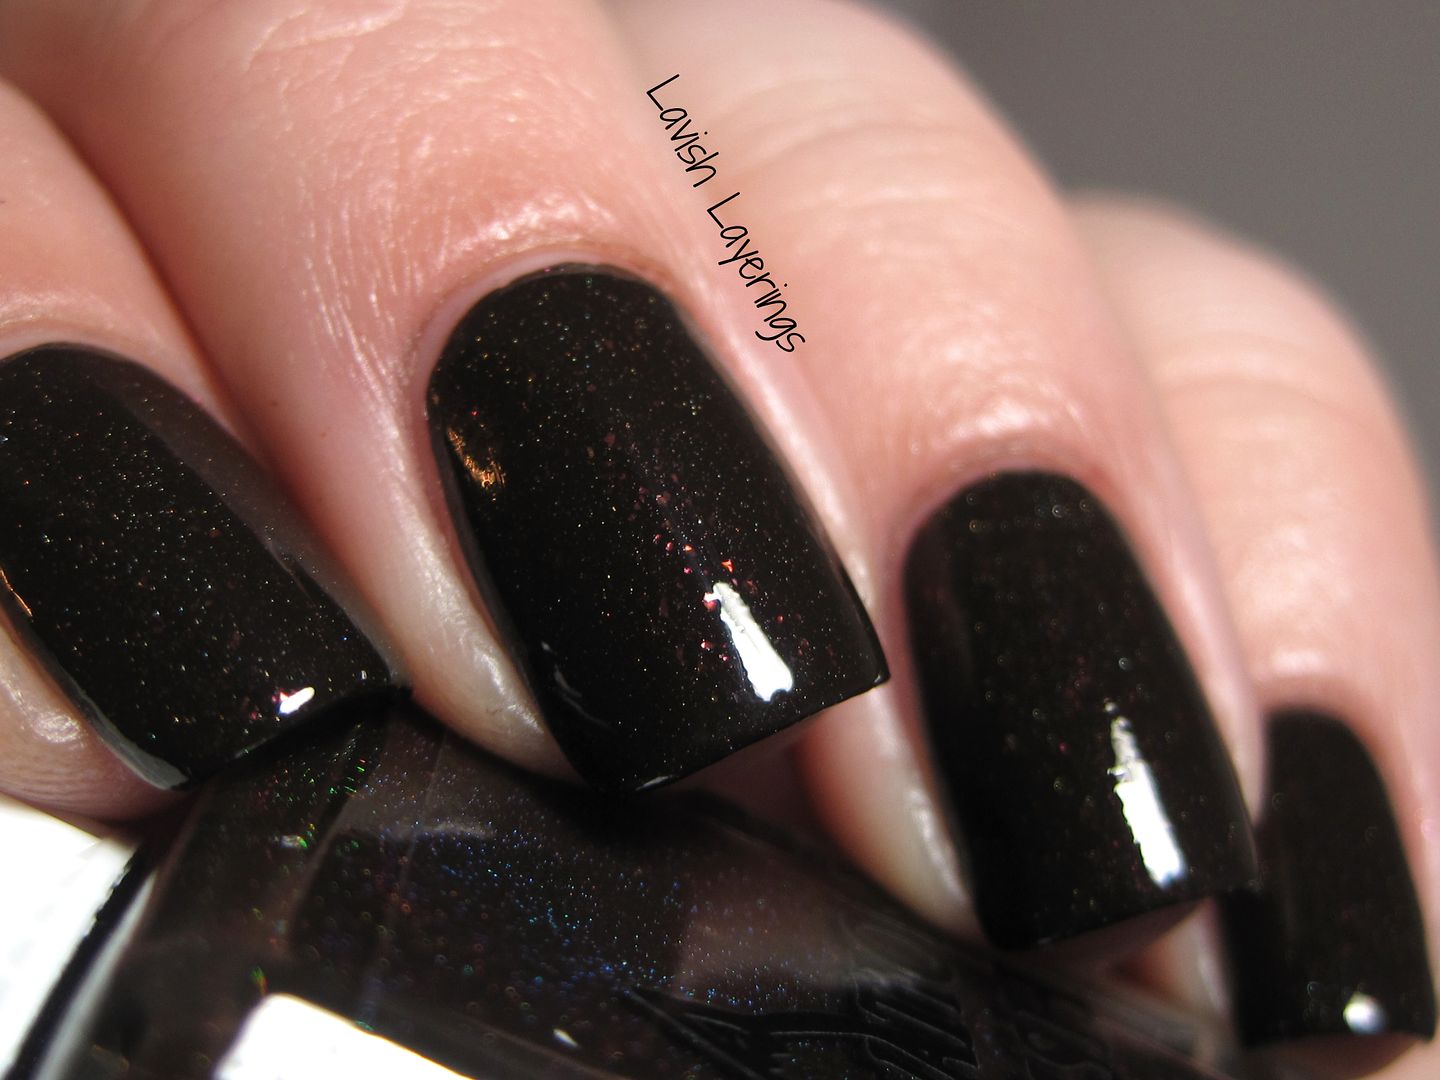
Elevation Polish Rose Cardamom Chocolate Truffles is a dark chocolate brown creme with pink and bronze flakes and a sprinkling of holo pigment. The flakes in this polish are just dreamy and you can see them flash when you move your fingers. They are subtle in some lights, but really pop in others (and are EXTREMELY hard to photograph, they are much more apparent in real life...none of this was helped by the fact that there has not been sunlight in my neck of the woods for a WEEK now). The holo sparkle also adds a nice depth to the polish. Lulu loves her browns, and she did such an excellent job on this one! I know everyone isn't a brown lover (I used to be anti-brown myself) but this one just might change your mind! Also...now I want to try a Rose Cardamom Chocolate Truffle because that sounds very sexy and delicious!
A Box, Indied is available from Llarowe for $50 each. Each box contains 5 polishes and/or products that are exclusive to that box and will not be available individually. You can sign up to receive a box each month or you can purchase the boxes individually when they are released. Follow Llarowe's Facebook page for announcements of exact dates and times of releases (the box for the next month is usually released around the end of the previous month.) She will also give previews of the products and makers that will be in the box (there is a rotation of makers that are included, it isn't always the same). Thanks for looking everyone!
Tuesday, January 13, 2015
Girly Bits What Happens in Vegas...Ends Up on Facebook
*Purchased by Me*
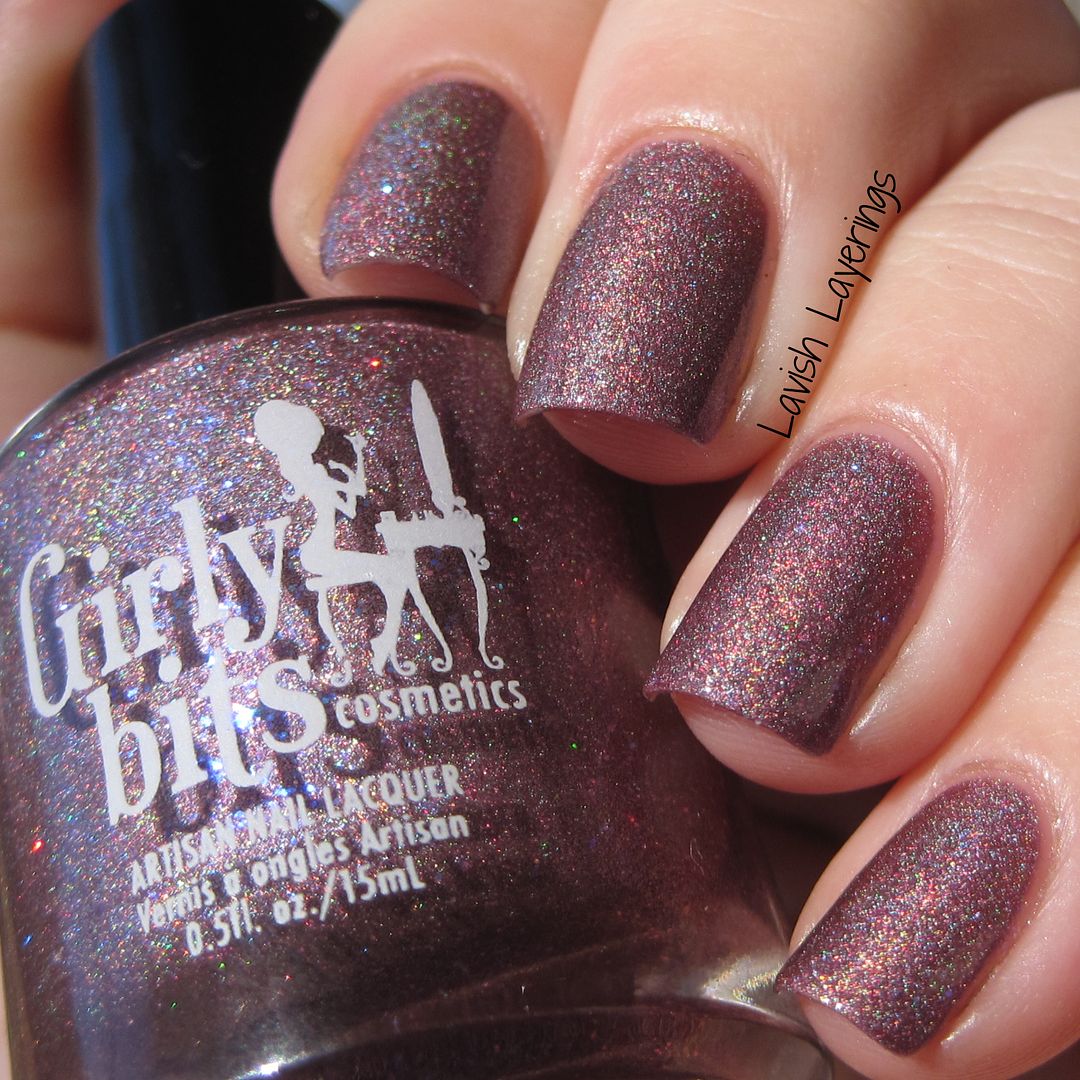
Hi everyone! Today I have a polish that I've had on my "to wear" list for ages. Girly Bits What Happens in Vegas...Ends Up on Facebook was created as an exclusive for Cosmoprof 2013 and Pam sold it in her shop as a limited edition. She re-released a newer version of it briefly in 2014 along with her 2014 Cosmoprof exclusive and I finally snagged it then, so I have the 2014 version that I'm showing you today.
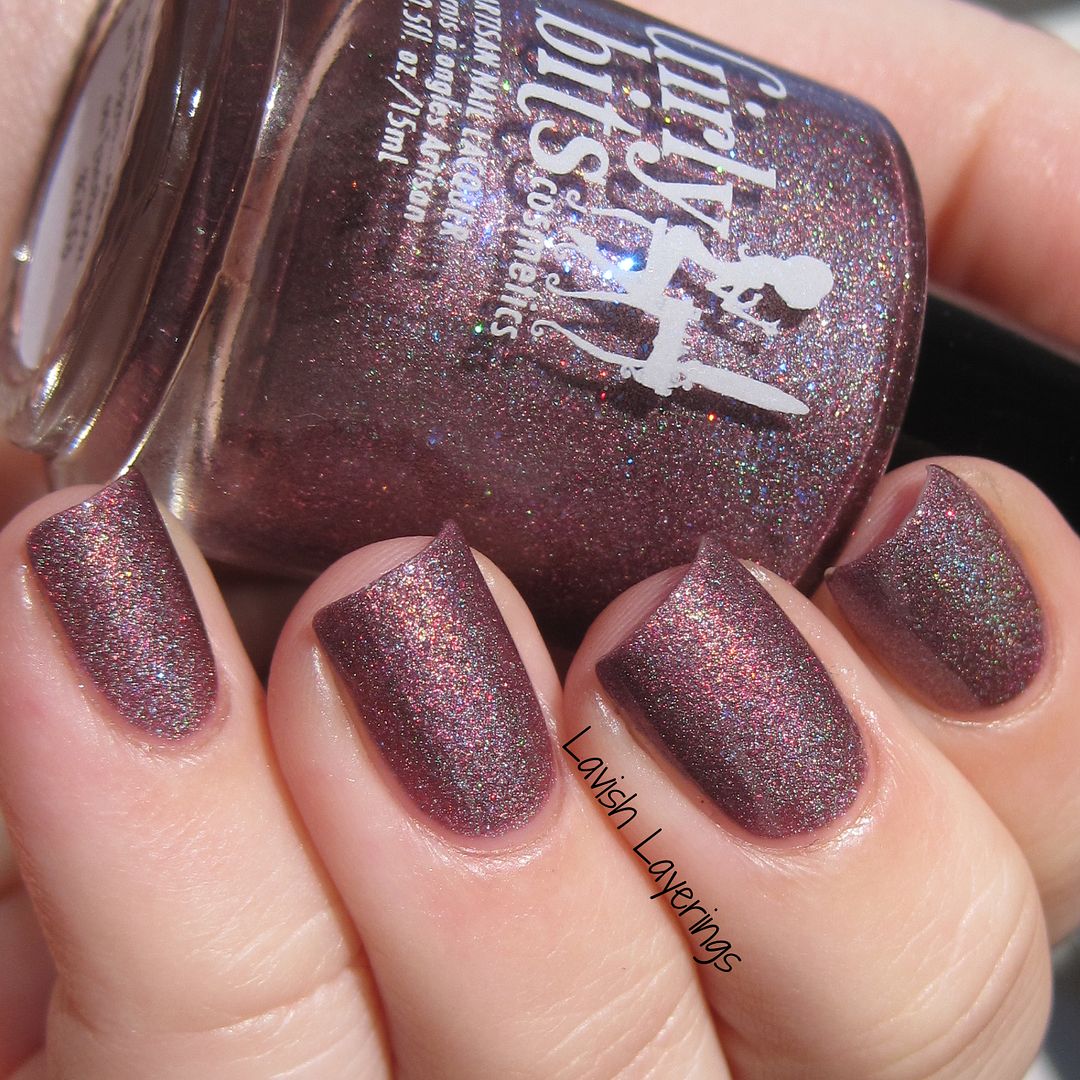
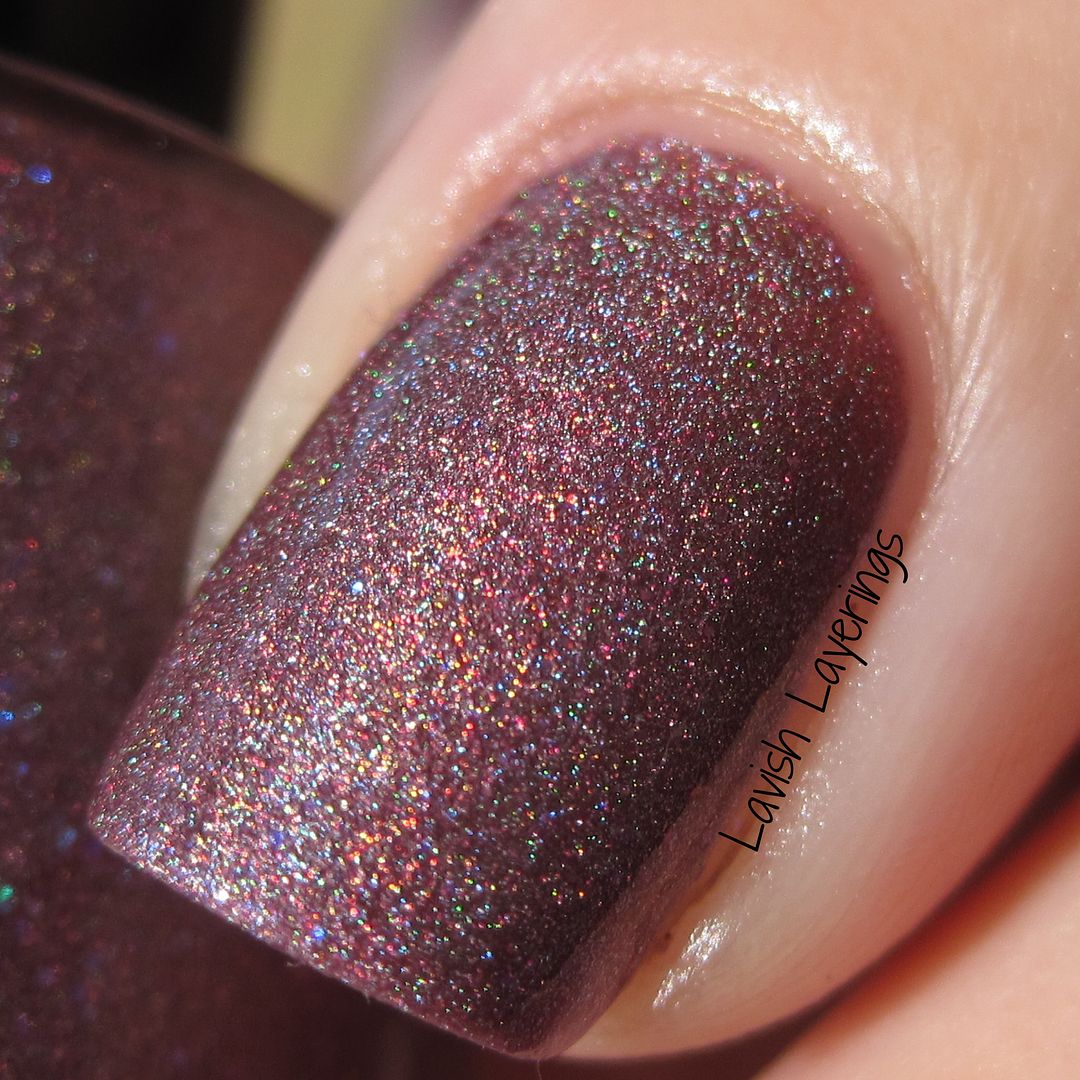
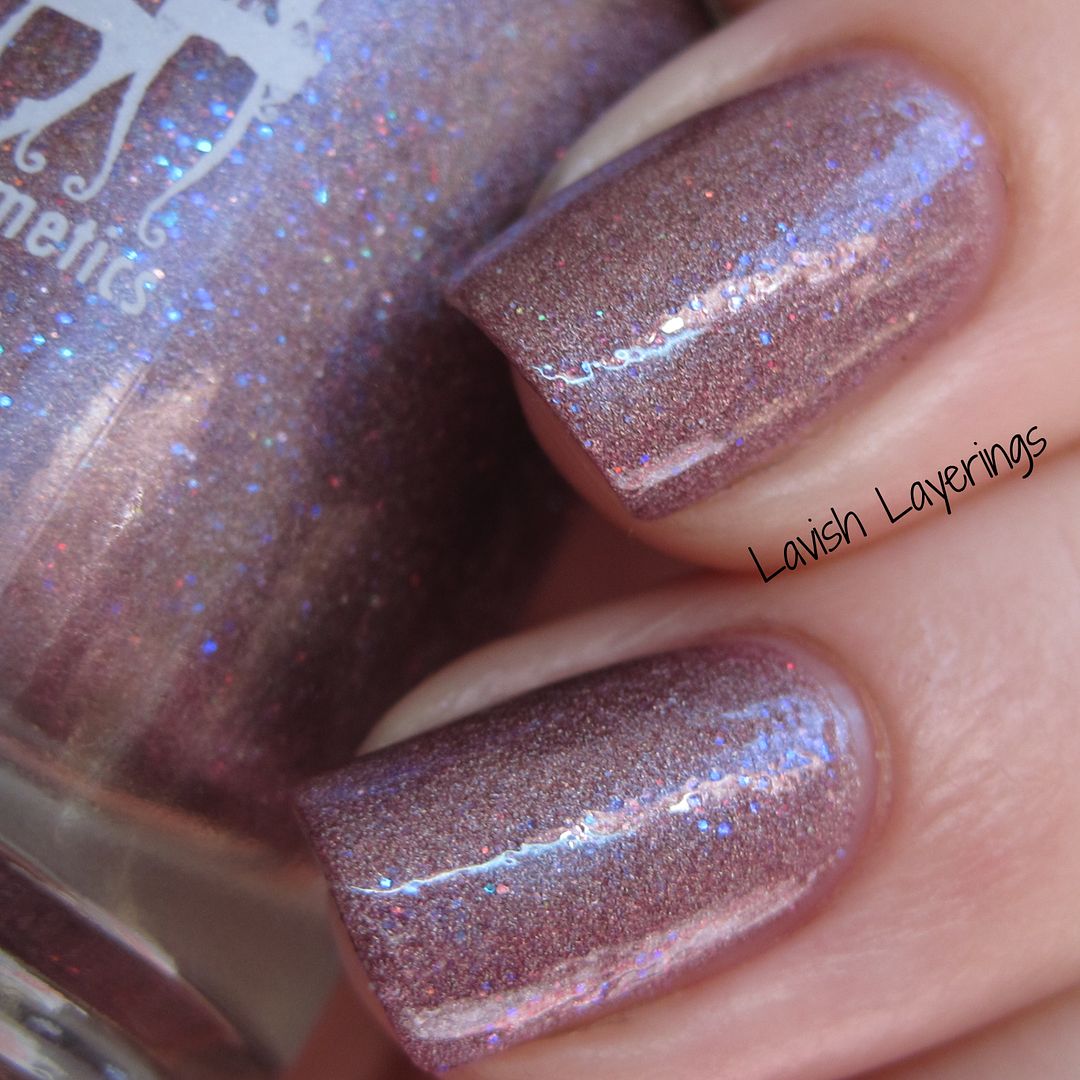
Girly Bits What Happens in Vegas...Ends Up on Facebook is a muted plummy purple scattered holo that has accents of blue/purple and red/green color shifting glitters. When it's in direct sun, the color looks deeper and richer and the sparkles aren't as noticable, but when you are in lower light, the color looks a bit more muted and the glitters sparkle like crazy! Formula was excellent and it was perfect at 2 coats. Even though this is purple, the muted nature of it made it feel like a super cool palette cleanser for me. I didn't want to take it off! Unfortunately, as I mentioned, this was a limited edition polish so it is no longer available in the Girly Bits shop. If you happen upon someone selling one though, I highly recommend it!
Girly Bits Cosmetics' polishes are available from creator Pam's online shop as well as from several other e-tailers that you can find here. Be sure to follow Girly Bits on Facebook and Instagram for news about restocks and new collections.
Hi everyone! Today I have a polish that I've had on my "to wear" list for ages. Girly Bits What Happens in Vegas...Ends Up on Facebook was created as an exclusive for Cosmoprof 2013 and Pam sold it in her shop as a limited edition. She re-released a newer version of it briefly in 2014 along with her 2014 Cosmoprof exclusive and I finally snagged it then, so I have the 2014 version that I'm showing you today.
Girly Bits What Happens in Vegas...Ends Up on Facebook is a muted plummy purple scattered holo that has accents of blue/purple and red/green color shifting glitters. When it's in direct sun, the color looks deeper and richer and the sparkles aren't as noticable, but when you are in lower light, the color looks a bit more muted and the glitters sparkle like crazy! Formula was excellent and it was perfect at 2 coats. Even though this is purple, the muted nature of it made it feel like a super cool palette cleanser for me. I didn't want to take it off! Unfortunately, as I mentioned, this was a limited edition polish so it is no longer available in the Girly Bits shop. If you happen upon someone selling one though, I highly recommend it!
Monday, January 12, 2015
Glam Polish Warlock
*Purchased by Me*
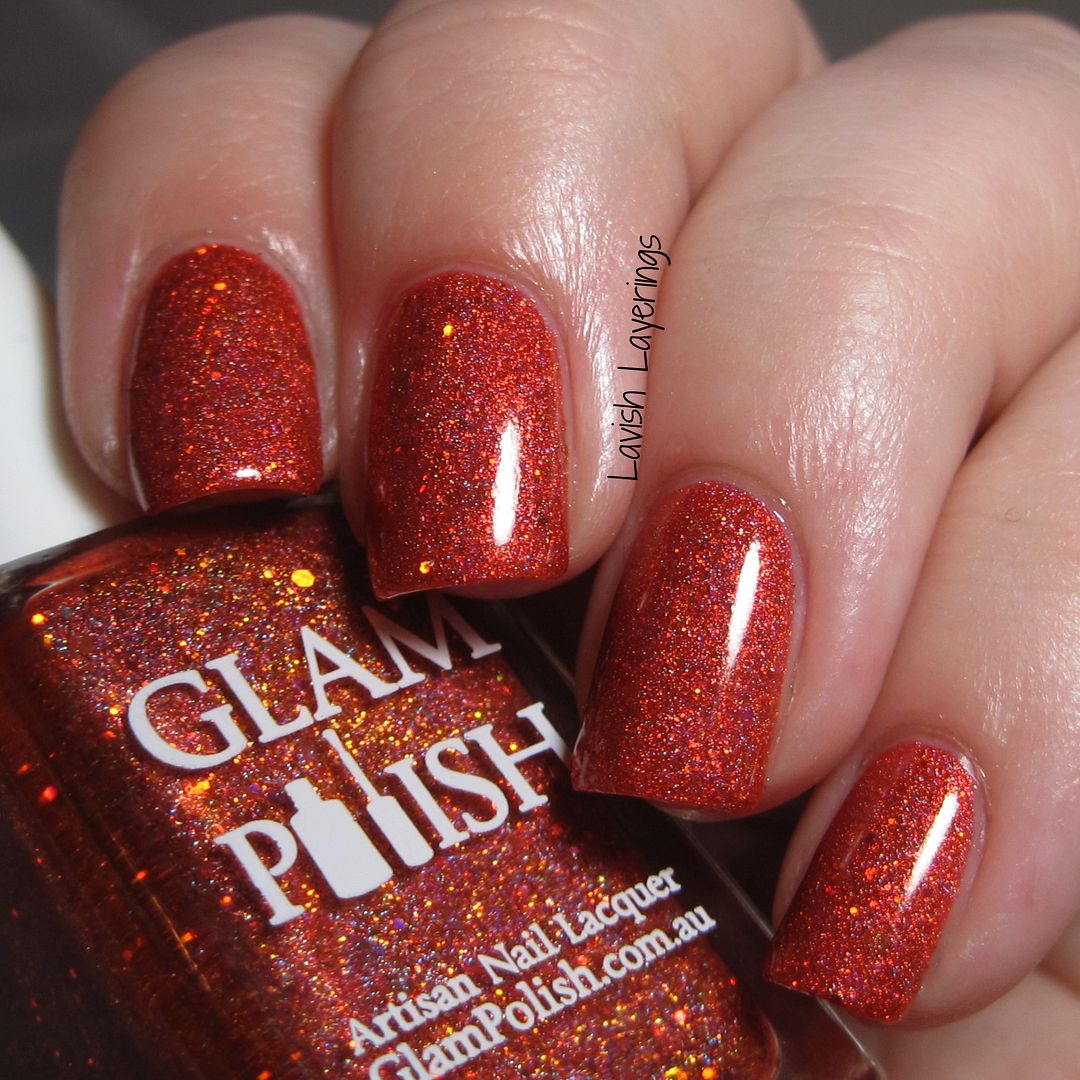
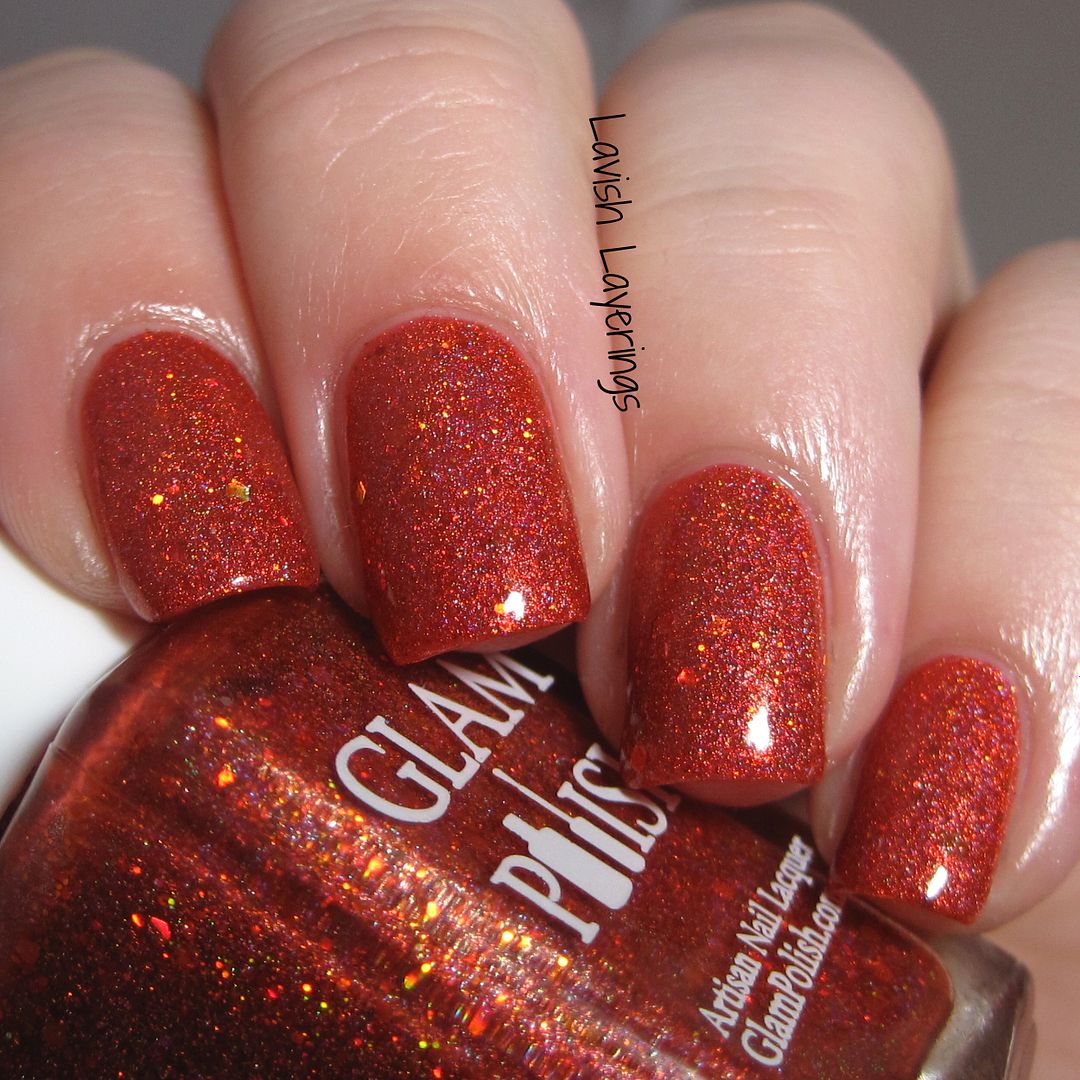
Hi everyone! I've shown you several polishes in the past from the Cast a Spell Part 1 and 2 collections from Glam Polish, and slowly but surely I'm getting more and more of them! I recently picked up the two I was lemming the most, Elixir and Warlock from the Part 2 Collection that was released this past Halloween. I had a hard time trying to pick which one to wear first, but I finally decided on Warlock.
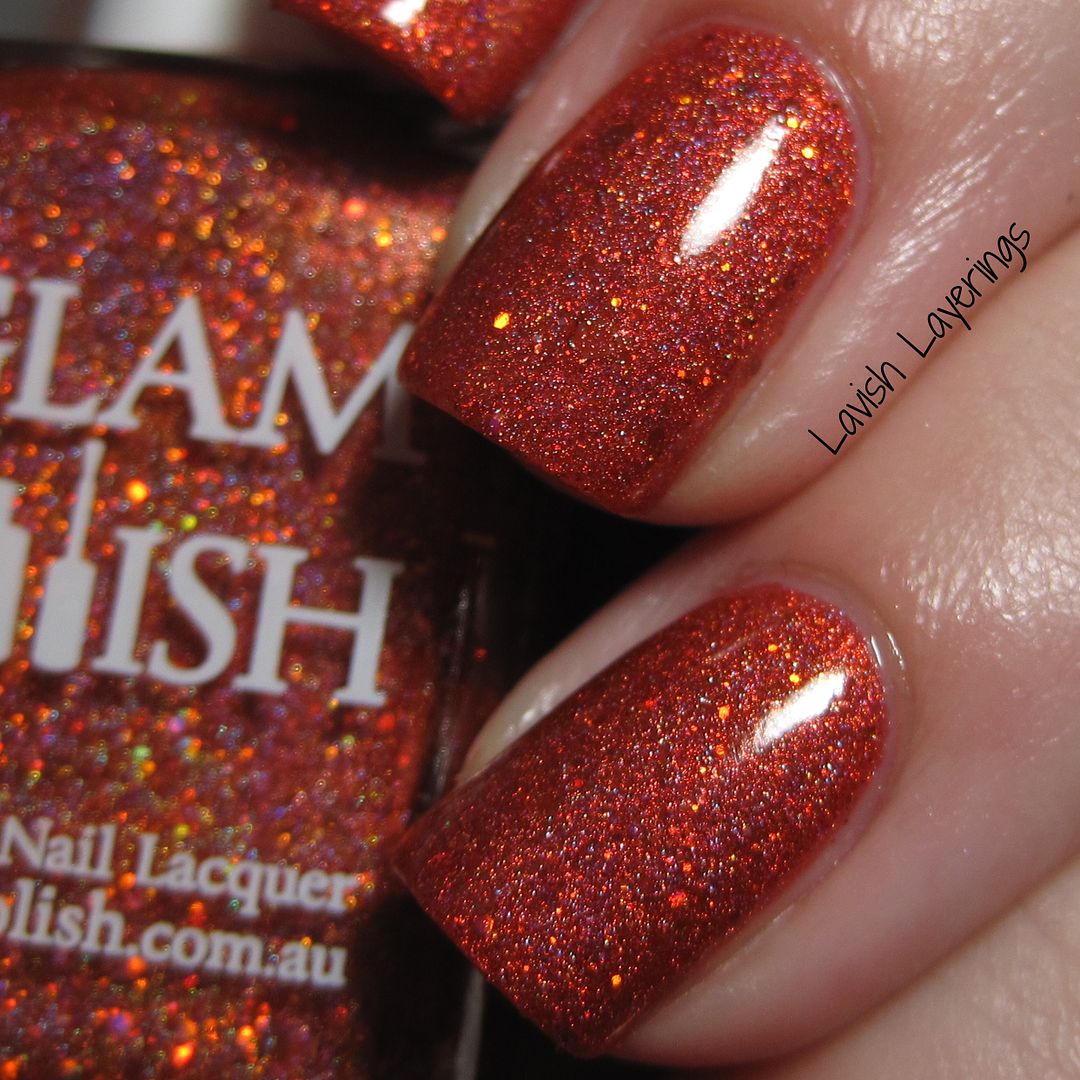
Glam Polish Warlock is a reddish orange holographic polish filled with various sizes of orange microglitter. This polish leans very red in some lights and very orange in other lights so it's not a true pumpkin orange which makes it a bit unique. Formula was very nice and built up perfectly in 2 coats. I used a thicker topcoat to get the polish smooth, but only 1 coat (I used Darling Diva Polish's Pryzmatic PETC). I have a huge weakness for oranges, and this one is just amazing!
Glam Polish is available from their Big Cartel shop (ships to Australia and the US only) as well as from these international stockists. Follow them on Facebook and Instagram for updates on new collections and restocks as well as to see lots of beautiful swatches! Thanks for looking everyone!
Sunday, January 11, 2015
Multichrome Stamping Featuring Born Pretty Store and I Love Nail Polish
*Some Press Samples Used*
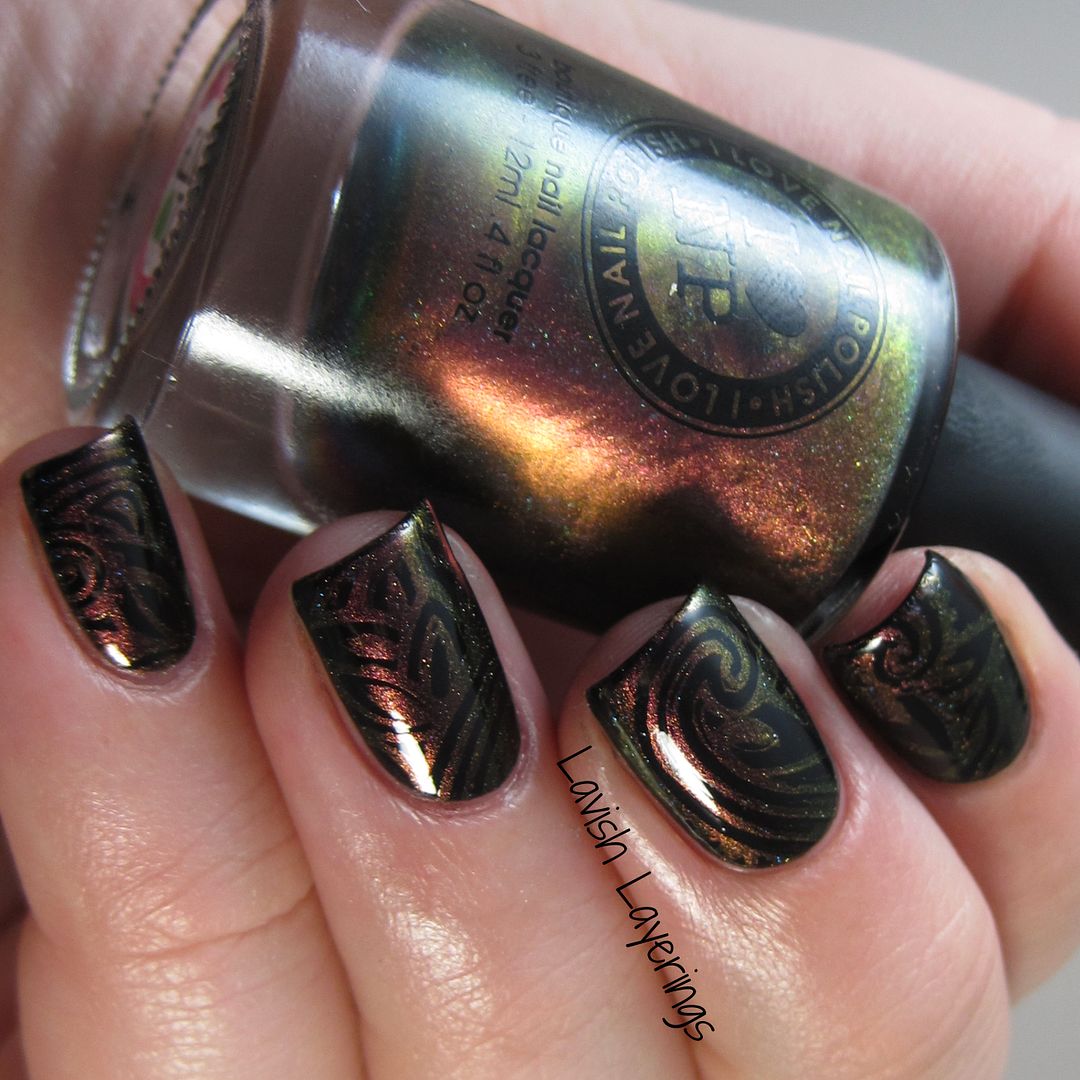
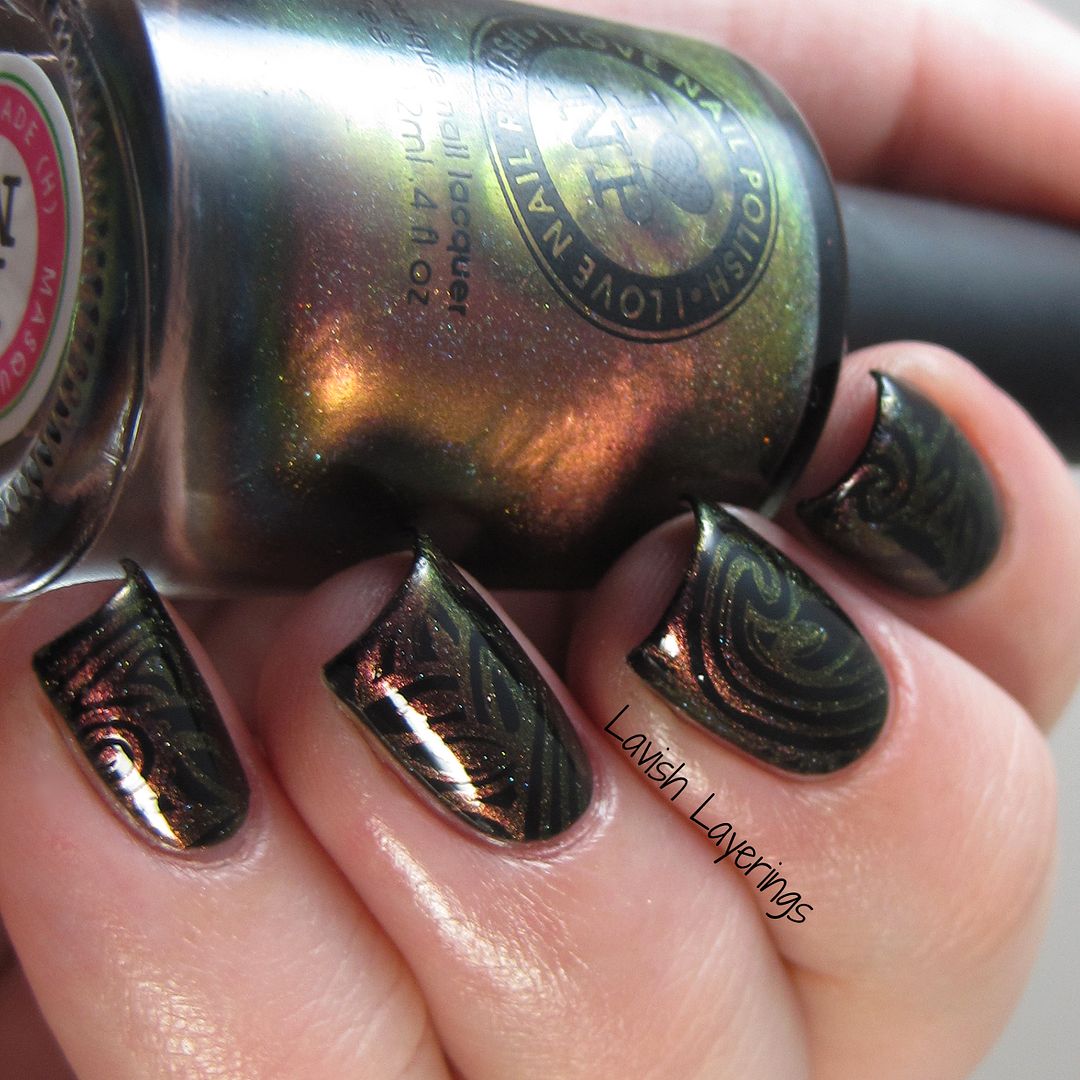
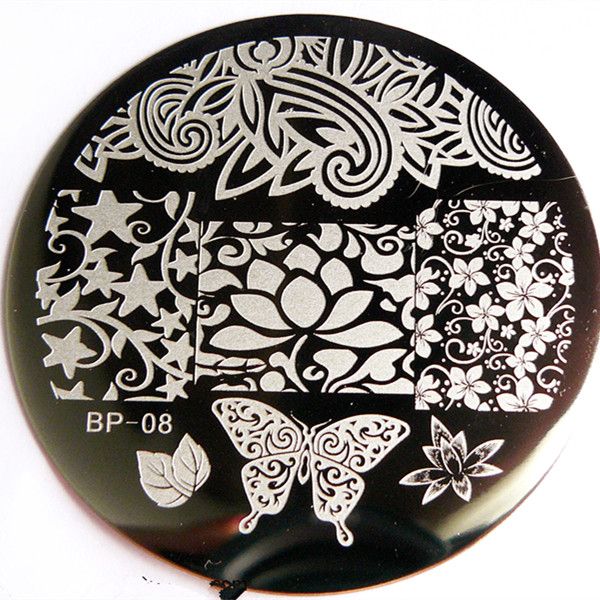
Hi everyone! Today I've got some fun multichrome stamping for you! I picked out I Love Nail Polish Masquerade (H) and Born Pretty Store plate BP08 for the stamping. I started off with a base of Zoya Willa and then did my multichrome stamping. I'm not exactly sure what this image is...it reminds me of abstract jungle leaves or something. It's a really neat image that has a lot of complexity and is large enough that you have several "pieces" you can choose from for a cohesive stamped mani where every nail isn't exactly the same. The plate was etched well and the design stamped really crisply without a lot of bare spots, which I have found is sometimes an issue with images that have wide etching in them. This mani was so fun in real life and the holo picked up a bit more in person. I'm always a fan of multichrome stamping!
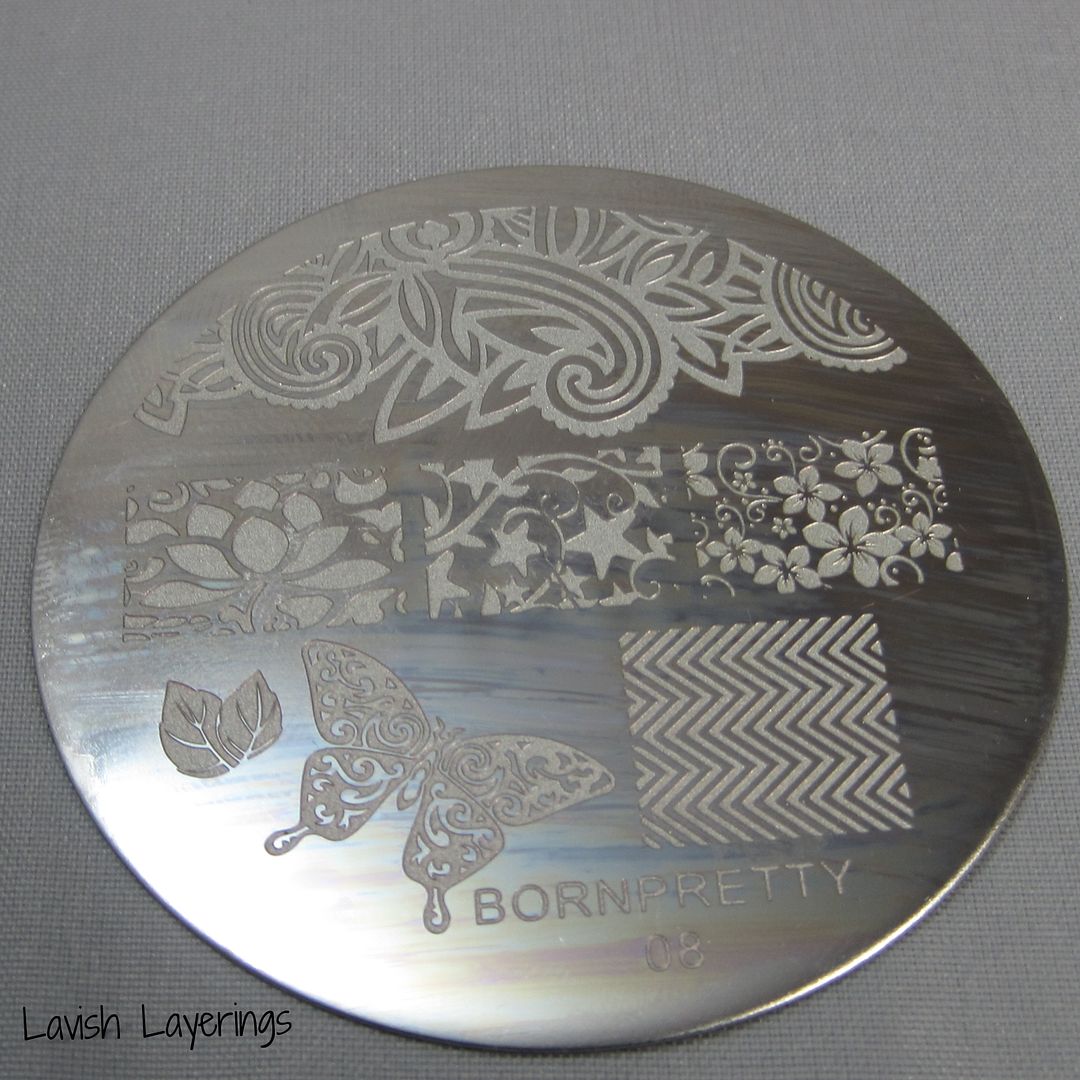
Now, some things I want to say about this particular plate. I received an earlier version of the plate and I heard a lot of complaints (and I agree) that the middle images of this plate aren't very usable because they are so small/narrow. I think they would only maybe be wide enough to use for my pinky nail or very carefully placed one of my smaller nails (definitely not my thumb). Luckily, Born Pretty Store listened to the customers and made immediate changes to the plate. (I'm sorry for my crappy picture, I forgot to take a picture of the plate before I used it and the acetone made it look streaky).
You can see below from the new image from Born Pretty Store's Website that they have made those changes to the plate and the images look much larger and nicer now. They did remove the chevron pattern, but I much prefer the images that they kept and I appreciate that they listened to their customers and fixed the issue.
Be sure to check out Born Pretty Store for all of your nail art supply needs (you can use my coupon code JCX31 for 10% off your order). I've always had great experiences with ordering from them at very reasonable prices. Also, you can't beat free worldwide shipping! You can also follow Born Pretty Store on Facebook and Instagram.
So what do you think of my multichrome stamping? Have you ever tried it? Thanks for looking everyone!
Hi everyone! Today I've got some fun multichrome stamping for you! I picked out I Love Nail Polish Masquerade (H) and Born Pretty Store plate BP08 for the stamping. I started off with a base of Zoya Willa and then did my multichrome stamping. I'm not exactly sure what this image is...it reminds me of abstract jungle leaves or something. It's a really neat image that has a lot of complexity and is large enough that you have several "pieces" you can choose from for a cohesive stamped mani where every nail isn't exactly the same. The plate was etched well and the design stamped really crisply without a lot of bare spots, which I have found is sometimes an issue with images that have wide etching in them. This mani was so fun in real life and the holo picked up a bit more in person. I'm always a fan of multichrome stamping!
Now, some things I want to say about this particular plate. I received an earlier version of the plate and I heard a lot of complaints (and I agree) that the middle images of this plate aren't very usable because they are so small/narrow. I think they would only maybe be wide enough to use for my pinky nail or very carefully placed one of my smaller nails (definitely not my thumb). Luckily, Born Pretty Store listened to the customers and made immediate changes to the plate. (I'm sorry for my crappy picture, I forgot to take a picture of the plate before I used it and the acetone made it look streaky).
My Plate:
You can see below from the new image from Born Pretty Store's Website that they have made those changes to the plate and the images look much larger and nicer now. They did remove the chevron pattern, but I much prefer the images that they kept and I appreciate that they listened to their customers and fixed the issue.
New plate image from Born Pretty Store's Site:
Be sure to check out Born Pretty Store for all of your nail art supply needs (you can use my coupon code JCX31 for 10% off your order). I've always had great experiences with ordering from them at very reasonable prices. Also, you can't beat free worldwide shipping! You can also follow Born Pretty Store on Facebook and Instagram.
So what do you think of my multichrome stamping? Have you ever tried it? Thanks for looking everyone!
Saturday, January 10, 2015
Super Girly Mani Featuring Born Pretty Store and Literary Lacquers
*Some items in this post are press samples*
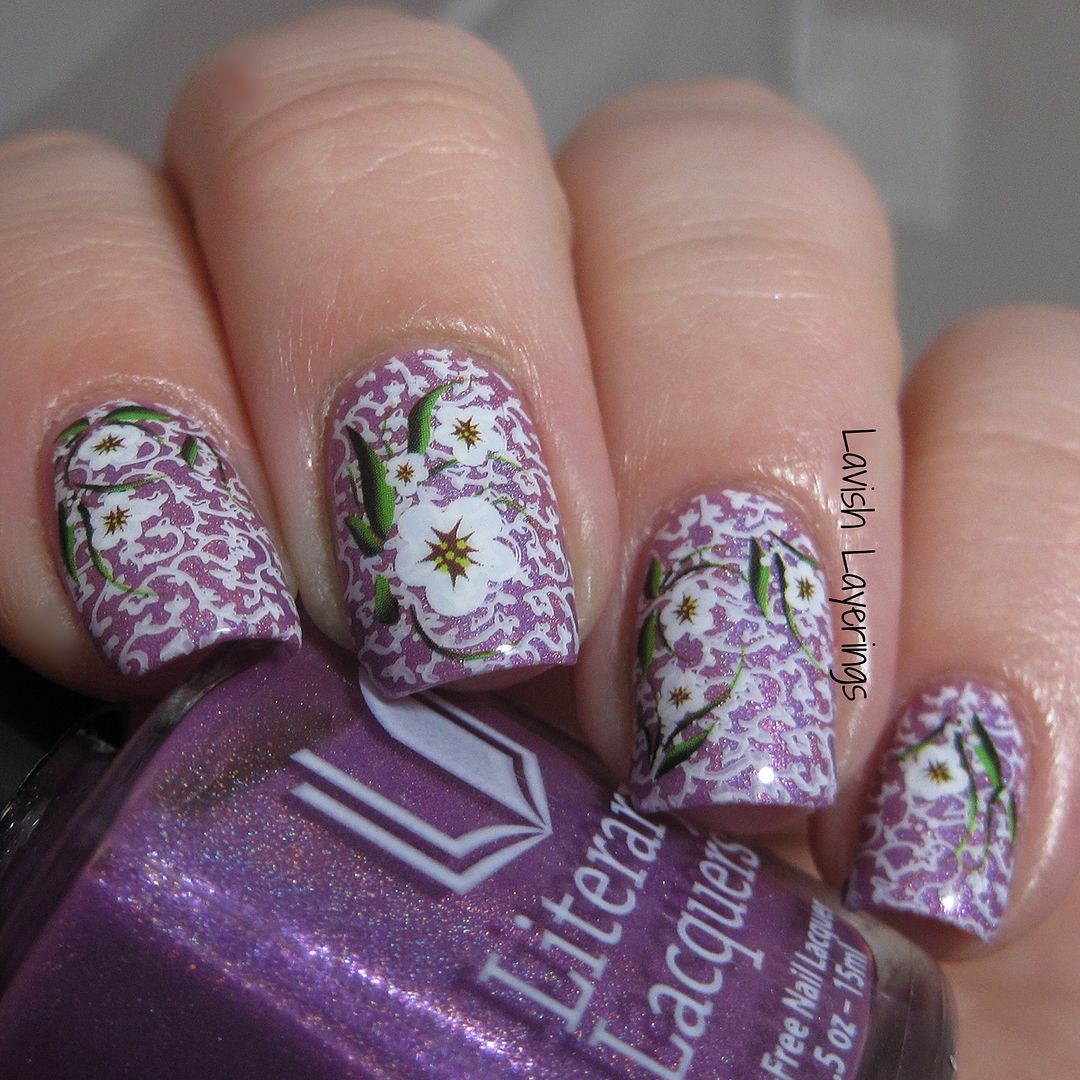
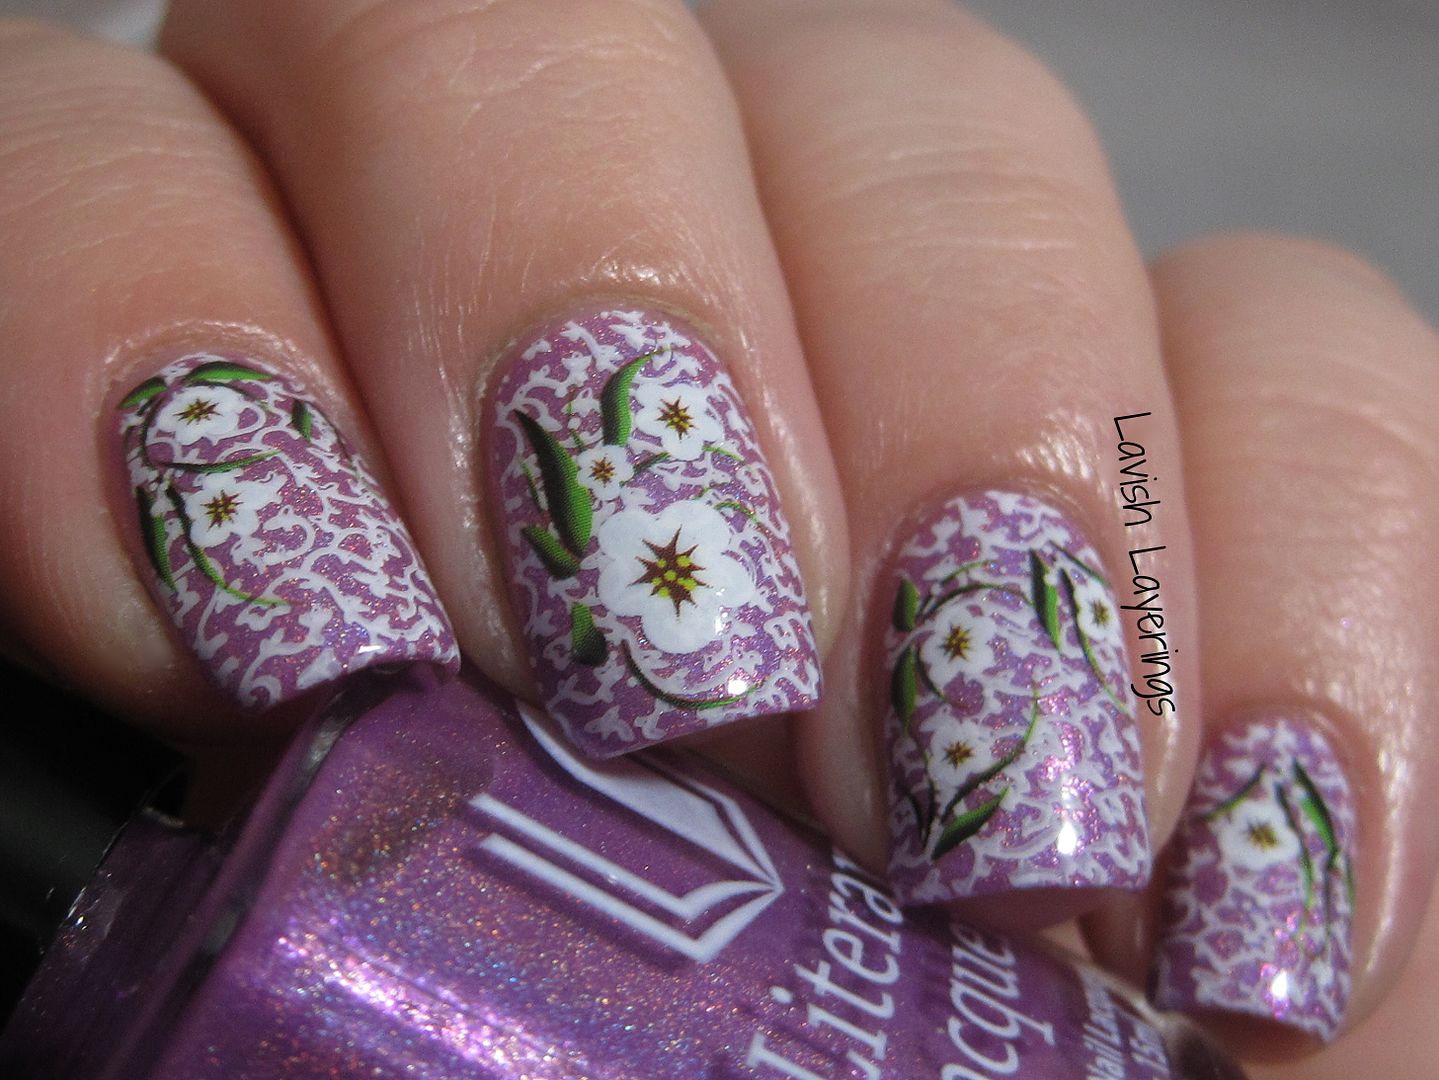
Hi everyone! Gosh, I have been looking through my folders and I have such a back-log of manis that I haven't shown you from the busy holidays! The mani I'm sharing with you today started out simple enough and then went into totaly girly craziness. I picked up a few polishes from Literary Lacquers' 2014 Community Collection when they launched (I'm hoping to have some swatch pics of my picks soon!), and I decided to wear Effie's Trinket one day because I was feeling like PINK in the middle of December. Once I got it on, it was just so girly and fun that I went crazy with the floral embellishment.
After Effie's Trinket dried, I used the floral vines design from Born Pretty Store stamping plate 05 and stamped with Mundo de Unas White. I previously used this plate here for another design, and it has several other cute designs on it that I look forward to using. It was definitely my favorite plate that I got to review because it could be used for so many looks. Once again, the image quality was great and it stamped pretty crisply. Then to take things even further, I decided to add some Born Pretty Store water decals to the design. I placed the cute floral decals (Fresh Orchids Leaves pattern) randomly around on the nail, and I thought they really brought the whole look together. I really enjoyed this mani as a break from all of the December red and green!
Be sure to check out Born Pretty Store for all of your nail art supply needs (you can use my coupon code JCX31 for 10% off your order). I've always had great experiences with ordering from them at very reasonable prices. Also, you can't beat free worldwide shipping! You can also follow Born Pretty Store on Facebook and Instagram.
So what do you think of my random girly mani? Is it too much going on for you? I was on the fence at first, but I really liked it! Thanks for looking everyone!
Friday, January 9, 2015
Scofflaw Winter 2015 Collection
*Press Samples*
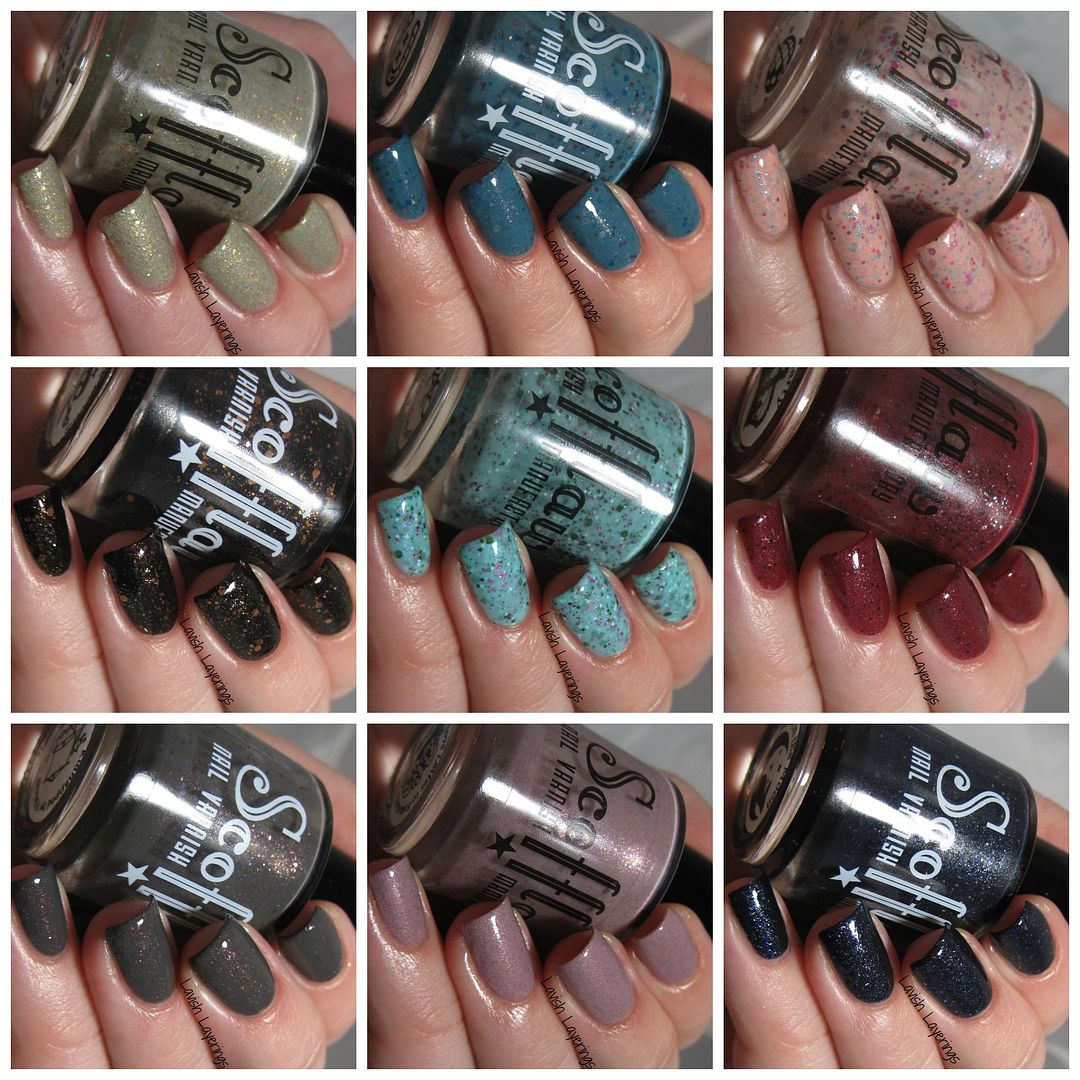
Hi everyone! Today I have Scofflaw's amazing Winter 2015 Collection to share with you. When I got this collection, I thought I had my favorites already picked out when I saw the bottles but the more I tried them, the more I fell in love with them. These are releasing on Sunday, January 11 at 12 pm central time on Scofflaw's website.
Hi everyone! Today I have Scofflaw's amazing Winter 2015 Collection to share with you. When I got this collection, I thought I had my favorites already picked out when I saw the bottles but the more I tried them, the more I fell in love with them. These are releasing on Sunday, January 11 at 12 pm central time on Scofflaw's website.
Thursday, January 8, 2015
Live Love Polish Seche Vite and Seche Audacious Review
*Press Sample, Affiliate Links*
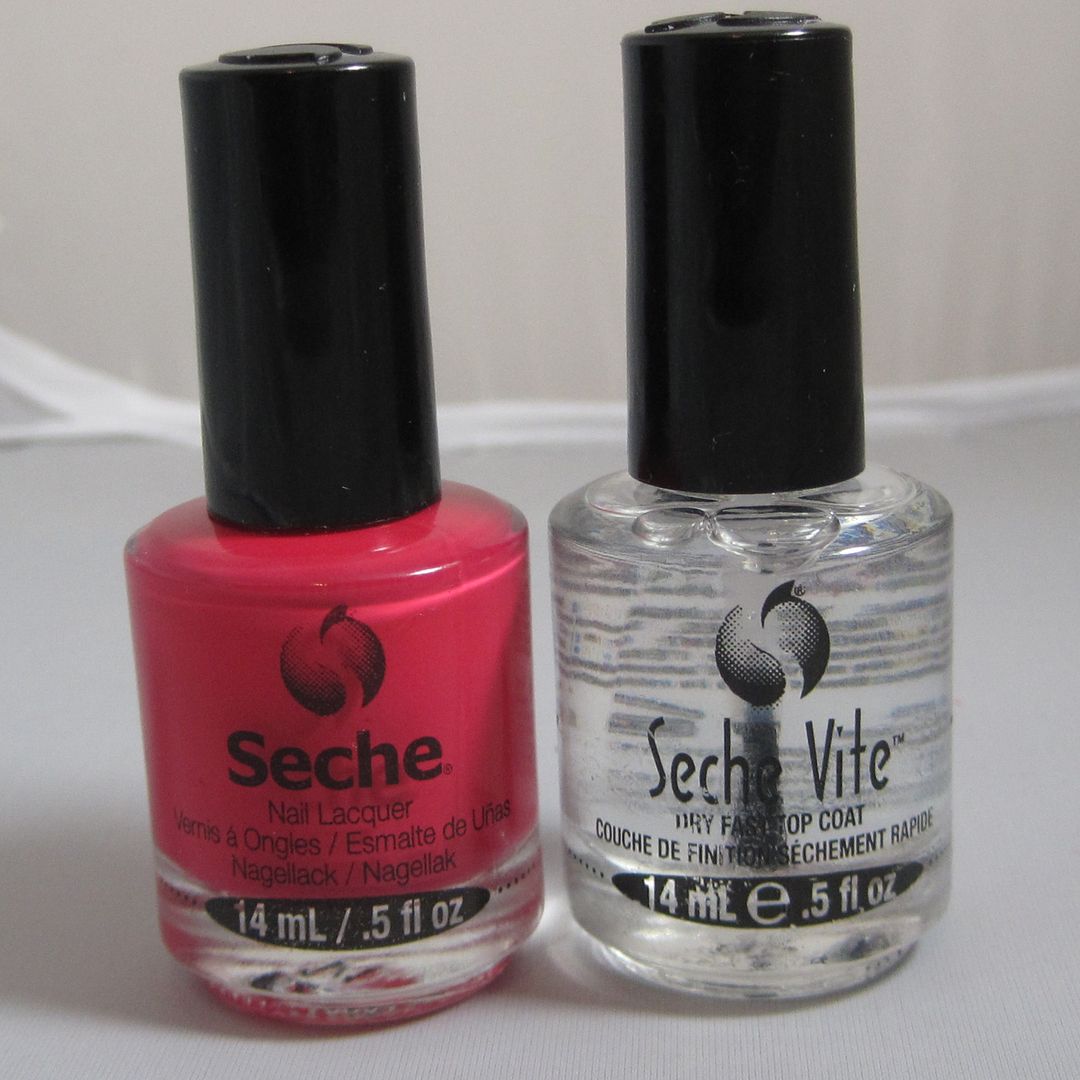
Hi everyone! I recently received two Seche products from Live Love Polish to review for you! I'm sure that most everyone has heard of Seche Vite topcoat which I will be talking about in this post, but Seche also has their own line of polish and this is my first time trying them out. I've seen some swatches and read good things about these before, so I was very excited to get to try one for myself!
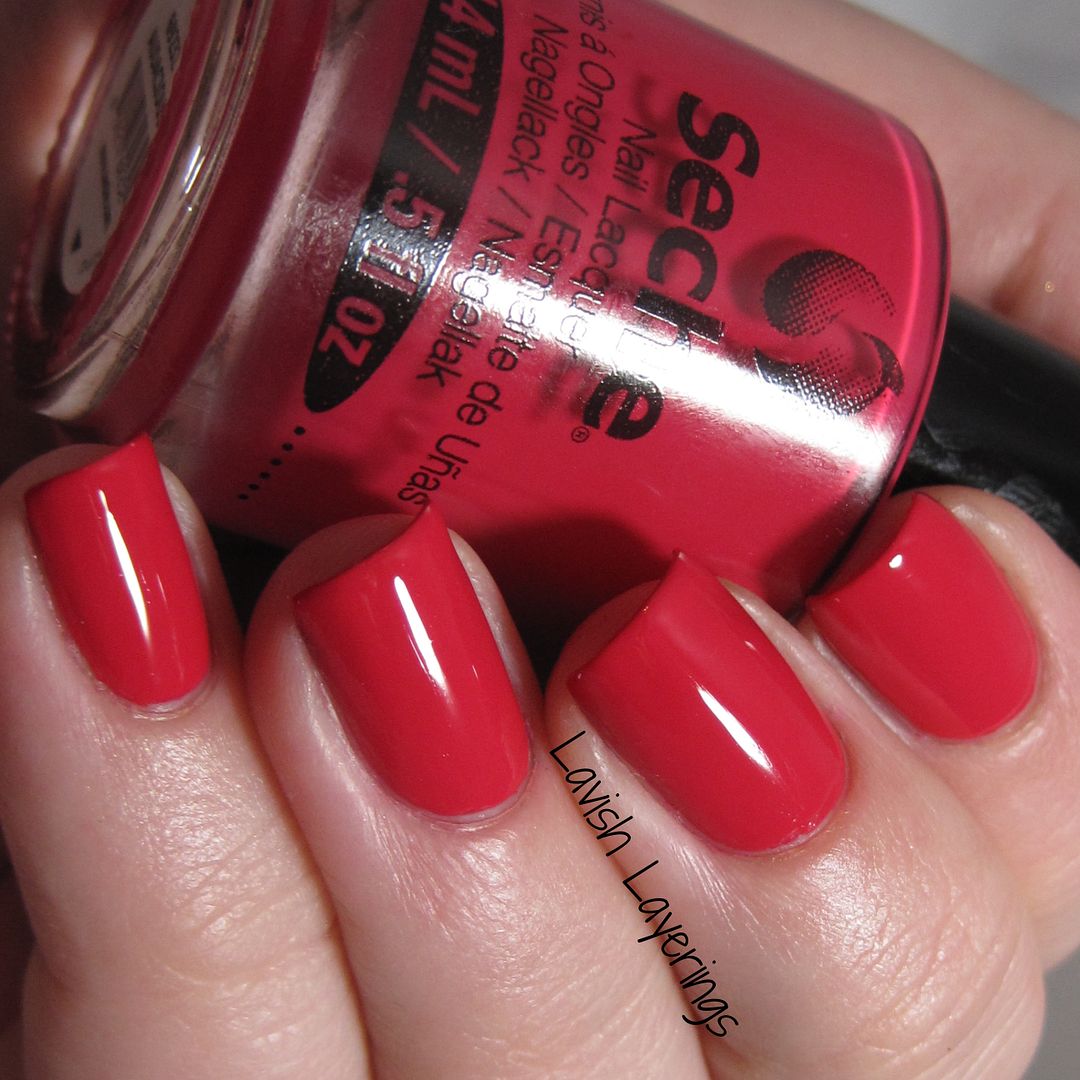
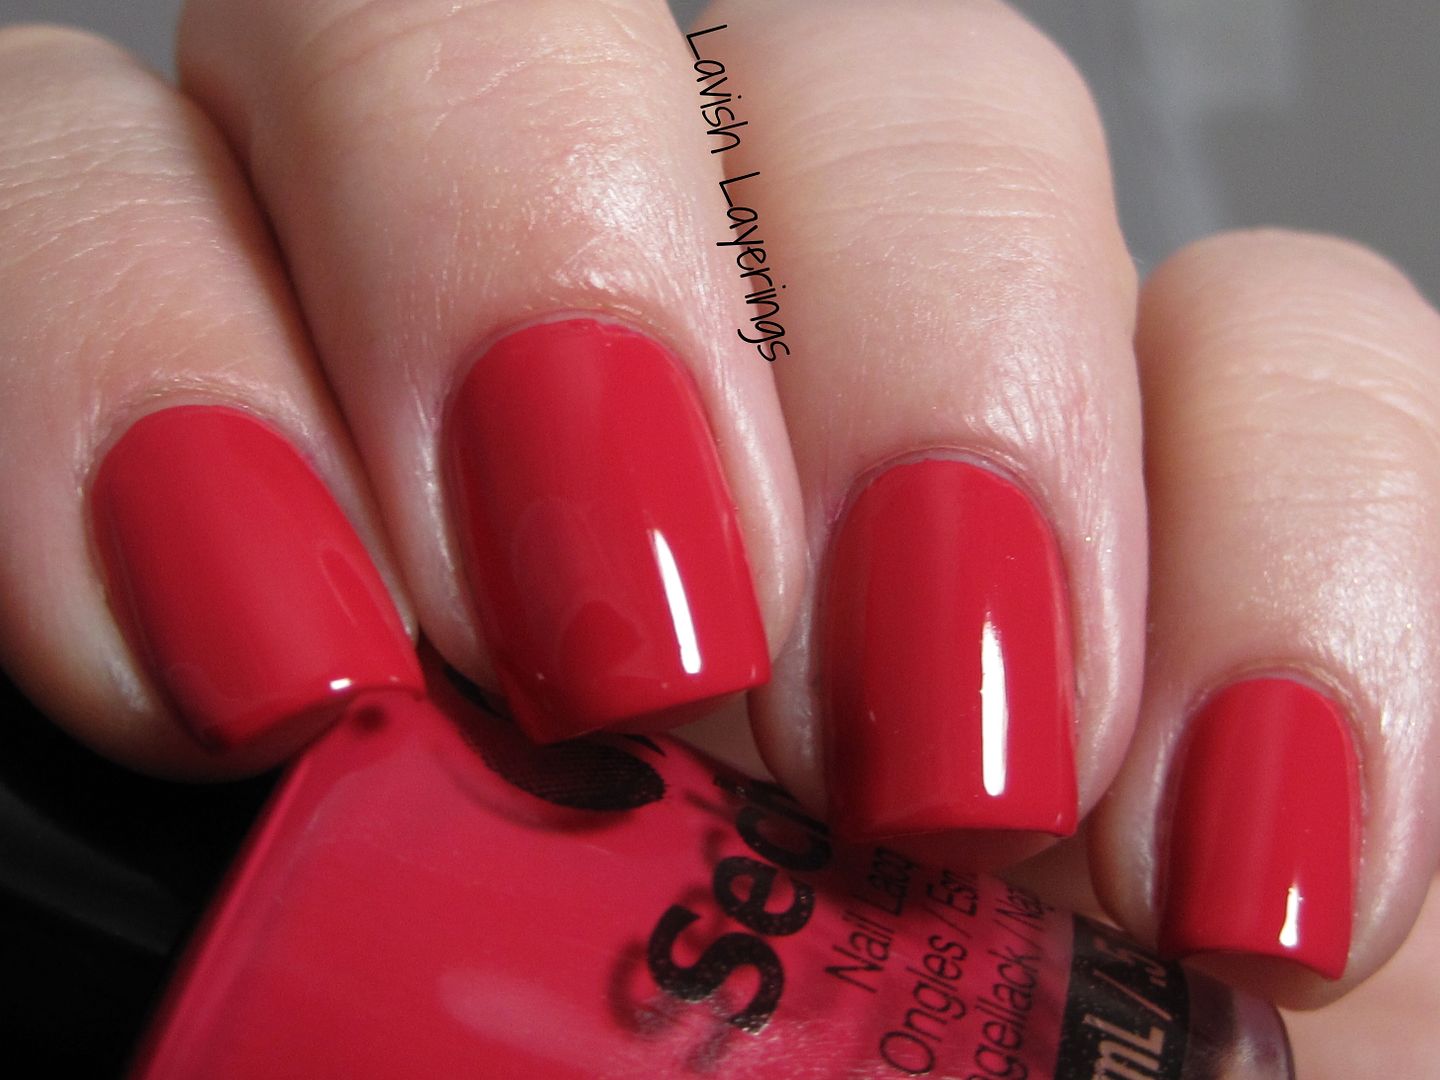
The polish that I was sent is Seche Audacious, a bright reddish pink creme. I'm pretty picky with cremes, and I was very impressed with the formula of this one because it was smooth and creamy with no dragging or pooling. With really careful application, it could be a 1 coater, but I used 2 thin coats here topped with 1 coat of Seche Vite topcoat. The color is really bright and cheerful and is one that I can see myself using a lot in the warmer months!
Now I will talk a bit about Seche Vite topcoat. I used to use Seche Vite exclusively several years ago. It is actually the topcoat that really got me into nail polish...quick-dry topcoat was a game changer! Over time though, I gravitated away from it because I found that it didn't play well with all brands of nail polish (namely Zoya, which I wear a lot) by causing polish shrinkage at the nail tips with those brands. Also, Seche Vite has to be used over polish while it is still wet/damp or it will cause polish to peel off in sheets, so it isn't ideal for manis where nail art is involved where (at least in my case) the base is pretty dry by the time you decide to topcoat.
Now the great things about Seche Vite (and why it has so many loyal fans):
*Fast Drying
*Super Shiny
*Thicker consistency (so it is easier to smooth out glitters without multiple coats)
*Very little bubbling (at least in my experience, if you keep it well thinned using Seche Restore, which is my very favorite Seche product that I use it religiously to keep all of my polishes thinned)
After re-trying Seche Vite again with this mani, I am pleased to report that it worked beautifully with Seche Audacious with no shrinkage at the tips and it has a wonderful shine! I'm going to re-incorporate it into my mani routine a bit and see how it plays with my polishes. Who knows, I may fall in love with it all over again for doing simple manis that I want dry in a hurry because you can't argue with that shine!
You can find Seche products on Live Love Polish's website along with many other brands of nail polish and nail products. Be sure to follow them on Instagram (@live.love.polish) to see lots of beautiful manis done with products that they carry!
So what are your feelings about Seche Vite topcoat? Are you a fan? Have you ever tried Seche's nail polish line? Thanks for looking everyone!
Wednesday, January 7, 2015
CrowsToes Even Sugar Melts in the Devil's Mouth for February's A Box, Indied
*Press Sample*
Hi everyone! Today I have the CrowsToes exclusive for February's A Box, Indied to share with you.
The theme of this box is "A Box, Candied", so all of the polishes are candy-themed. The other contributors to this box are Hare Polish, Elevation Polish, Serum No. 5, and Black Cat Lacquers. February's box will launch on January 26 at 12 PM and 7 PM Mountain time. Keep a watch on Llarowe's Facebook page to see the offerings from the other contributors to the box!
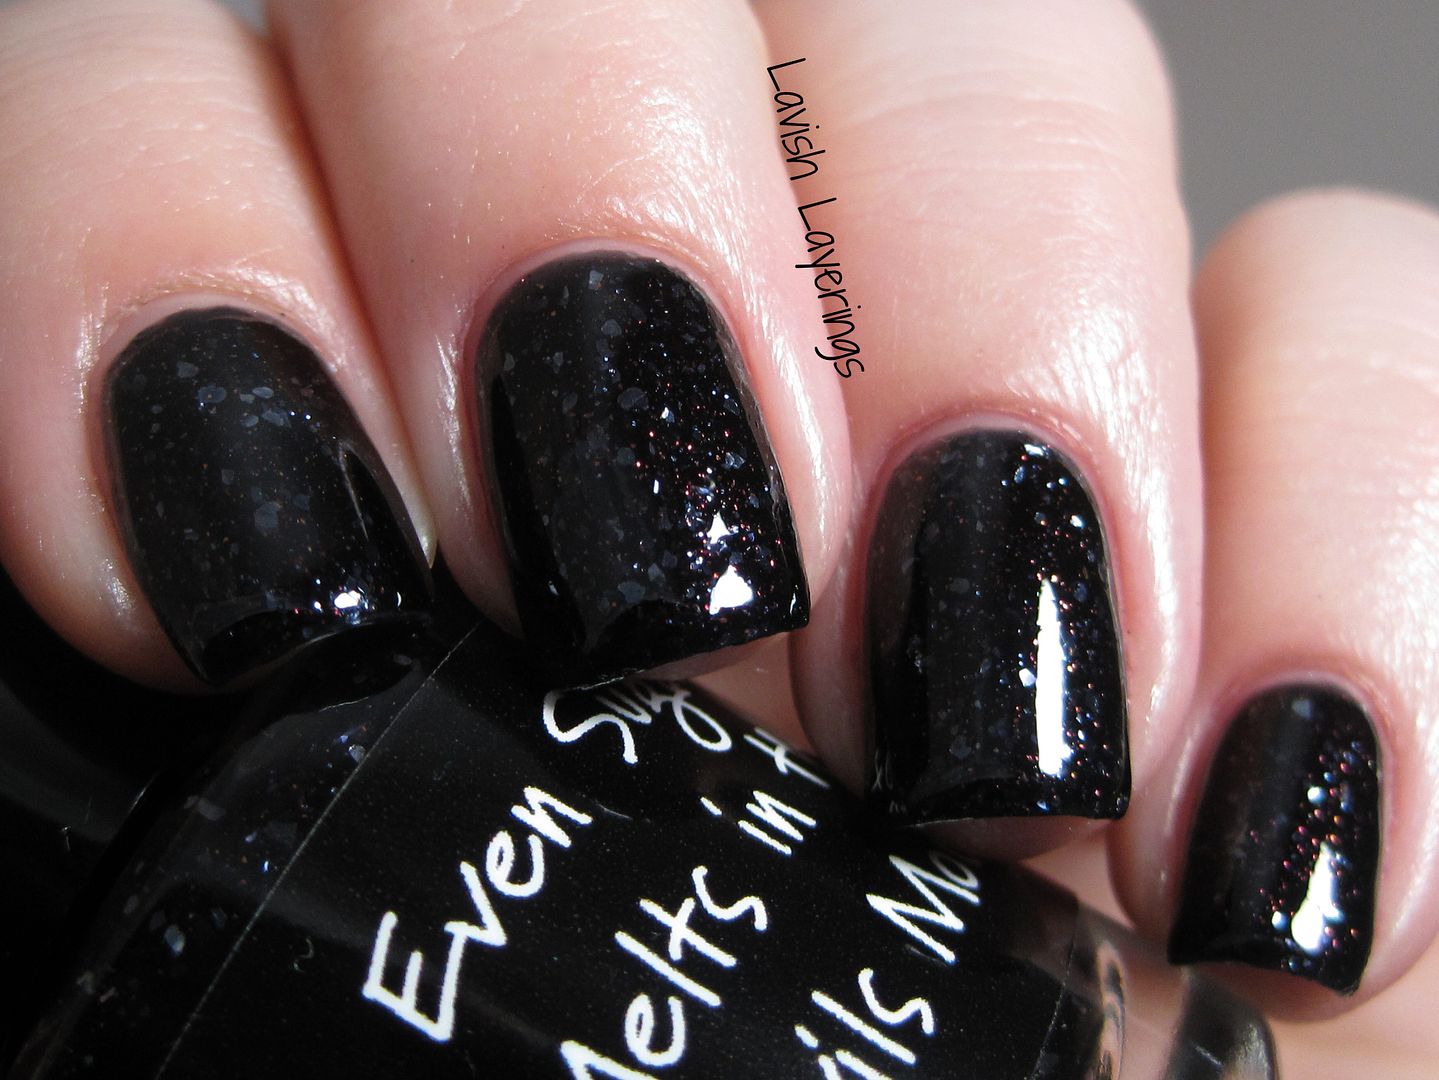
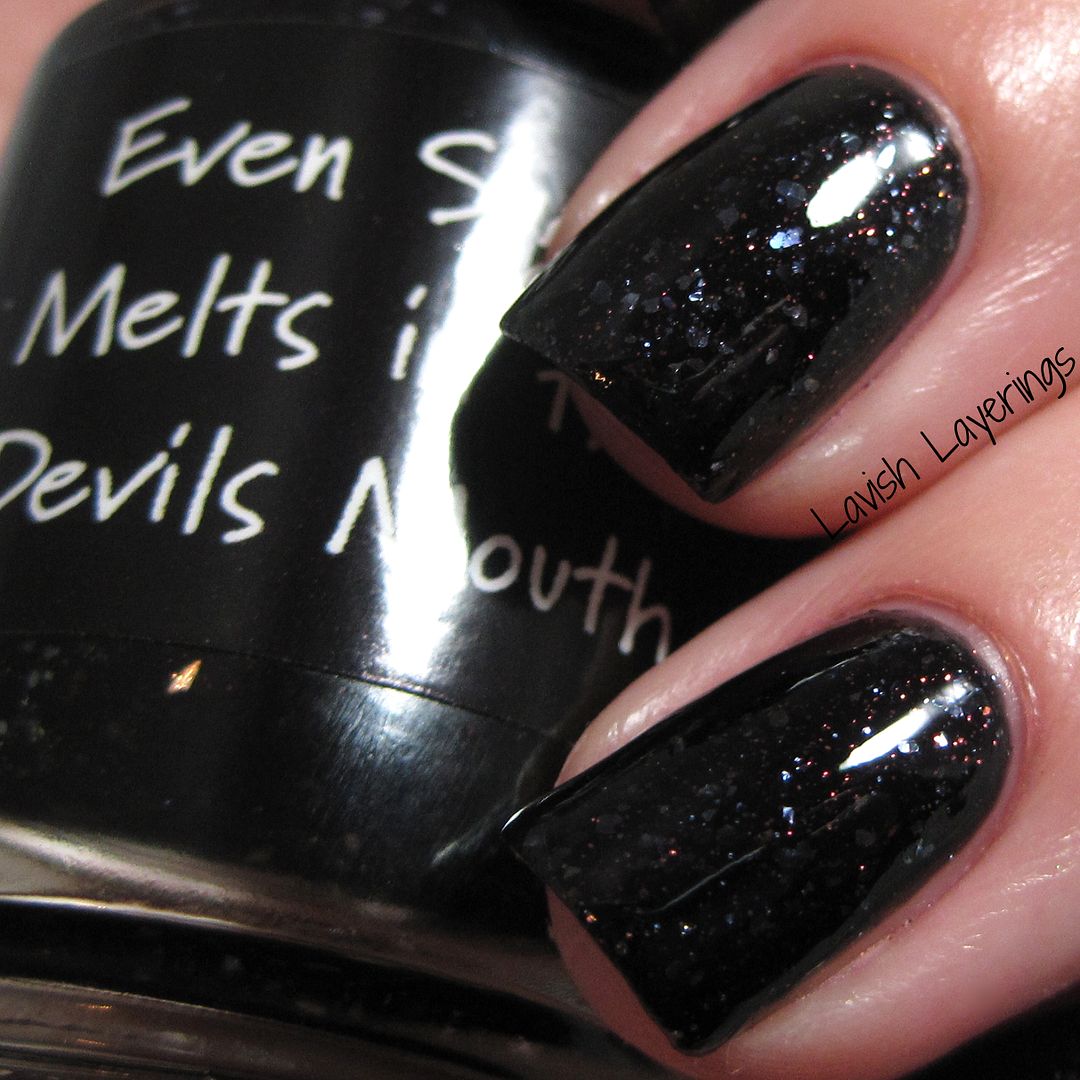
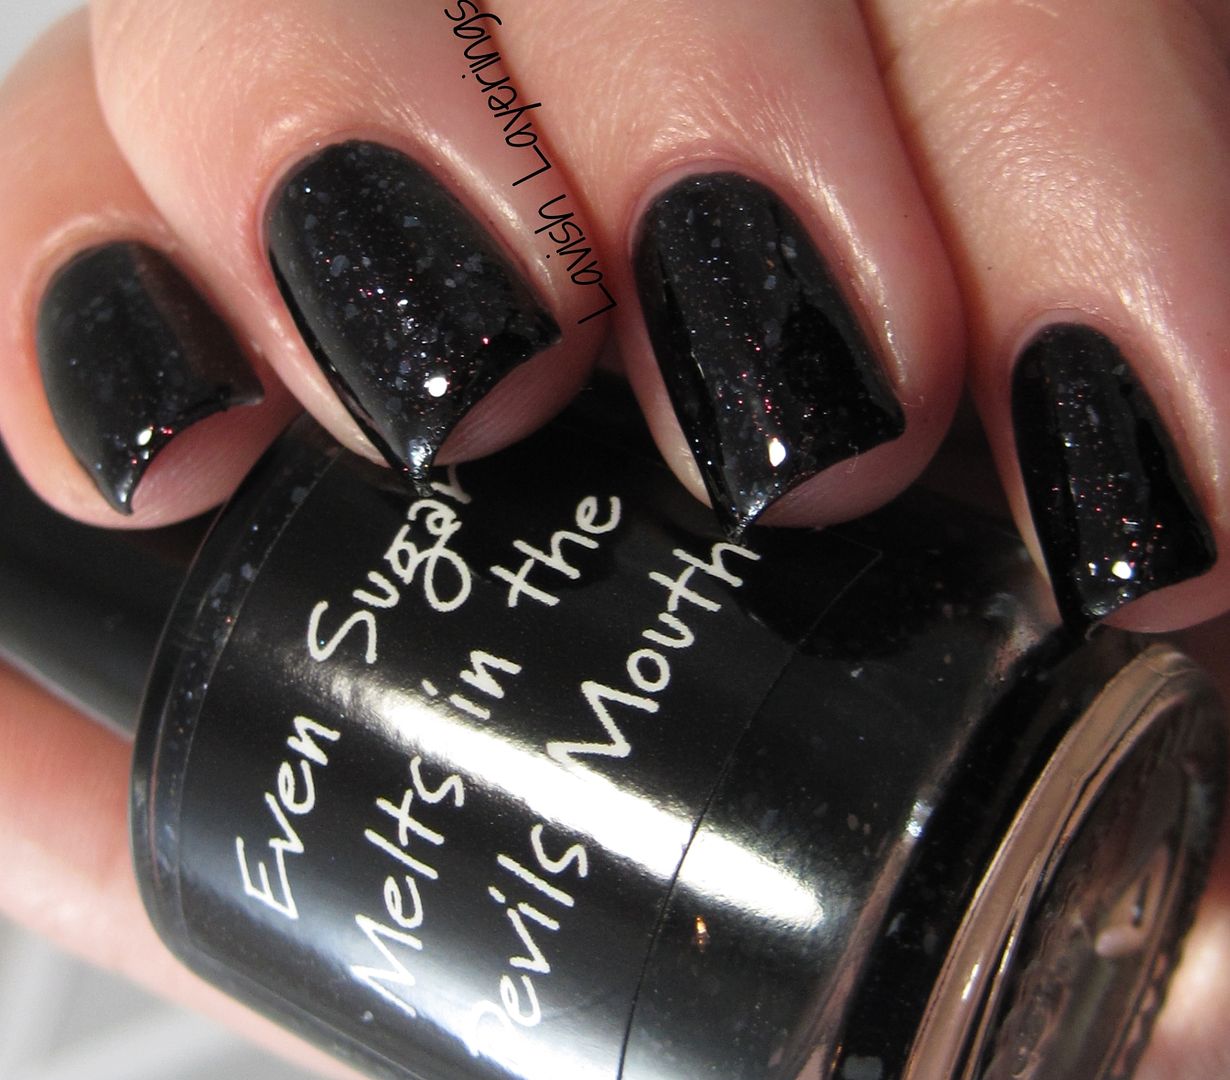
CrowsToes Even Sugar Melts in the Devil's Mouth is a black jelly filled with tiny red flake shimmer and larger translucent white flakes. Formula was really nice and built up easily in 3 thin coats. According to Pointless Cafe's post, this one was inspired by black rock candy, and I think it matches that inspiration perfectly! Leave it to Madam Crow to go for a darker theme when candy is her source of inspiration! LOL! This polish though...so gorgeous! The shimmering depth is just insane! I feel like this polish is the dark, moody (dare I say...devilish?) sister of That Boy is a P-I-G Pig! when Lauri was showing off a bit of her feminine, delicate side. I guess flakes can be ethereal AND evil!
A Box, Indied is available from Llarowe for $50 each. Each box contains 5 polishes and/or products that are exclusive to that box and will not be available individually. You can sign up to receive a box each month or you can purchase the boxes individually when they are released. Follow Llarowe's Facebook page for announcements of exact dates and times of releases (the box for the next month is usually released around the end of the previous month.) She will also give previews of the products and makers that will be in the box (there is a rotation of makers that are included, it isn't always the same). Thanks for looking everyone!
Subscribe to:
Comments (Atom)


